
How To: Display Your M365 Group in Outlook (If You Can't Find It)
Posted on February 24, 2021 • 6 minutes • 1126 words
Table of contents
If you’ve spent much time with the Microsoft 365 eco-system, then you know as well as I do that there are countless ways to create new M365 groups. Everyone has their own preferences, certainly, and there isn’t really a need to pick only one method. What gets created and set-up as a result of creating a group, however, DOES change depending on which method you pick, which leads me to the use case that prompted this blog.
The Problem
A coworker’s client was working on cleaning up their groups, but one was an older, larger group that had content already associated with it. So, they didn’t want to delete that group and start from scratch at the risk of losing that content.
The problem we ran into? In the Outlook Web App, even when searching for that group (henceforth known as Example Group), it wasn’t showing up in the left nav. It showed that we had joined the group, and one of the groups that had been remade was showing up, but not Example Group. We also knew our solution needed to make the Example Group show for all users, not just for ourselves.
The Clue
My coworker and I were furiously searching for solutions to the problem when I came across this comment on the wonderful Microsoft Tech Community (replying to BAT MAN, of all people):
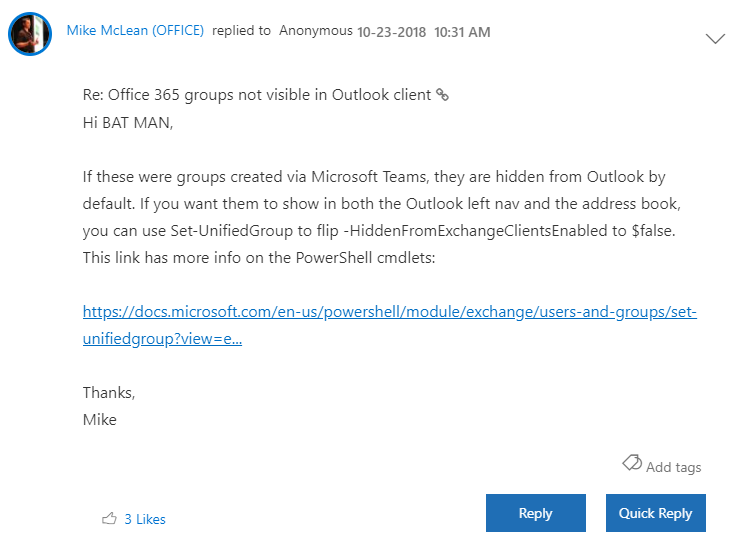
So, we wondered to ourselves, how do you even figure out where a group was created from?
Alas, we never figured out the answer to that particular question, but we decided that this Power Shell command was the solution to try to chase down, working under the assumption that this had been created in Teams.
The Solution
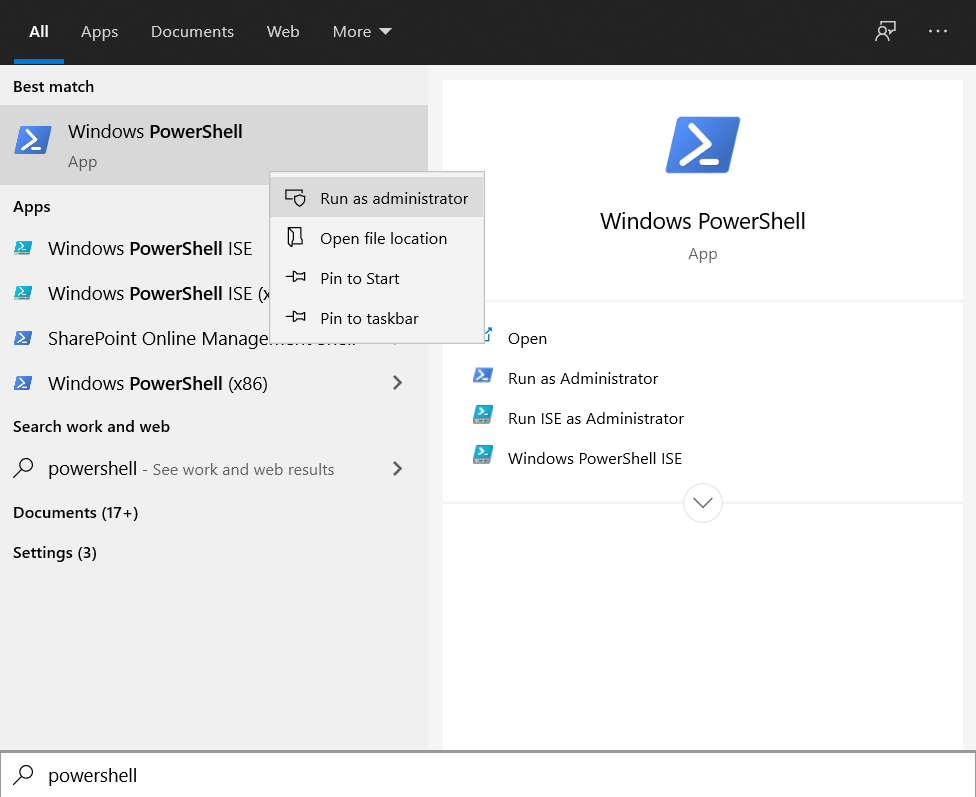
Power Shell can be overwhelming, and while I’m far from an expert, I wanted to walk you through all of the steps we took to get this mailbox to show. We have to start by opening Windows PowerShell as an administrator. We can do this by searching for “PowerShell”, right clicking on the icon, and clicking “Run as administrator”:
There are more detailed instructions located here, but I’ll walk you through the basics. One prerequisite to running this code started throwing error messages in our case was that we hadn’t ensured that PowerShell was configured to run scripts, which is isn’t unless you manually tell it to. The following code makes sure that every script you run has a valid certificate:
Set-ExecutionPolicy RemoteSigned
Next, you need to install the Exchange Online (EXO) PowerShell module using this code:
Install-Module -Name ExchangeOnlineManagement
Once you’ve accepted the license agreement by typing “y”, it is time to connect to the EXO module:
Import-Module ExchangeOnlineManagement
Now your next steps will depend on whether or not Multi-Factor Authentication (MFA) is turned in for your organization. More detailed instructions can be found here, but if you have MFA turned on, you will have to use more detailed syntax to connect to EXO. Examples of this syntax for different types of organizations can be found here.
Connect-ExchangeOnline -UserPrincipalName <UPN> [-ExchangeEnvironmentName <Value>] [-DelegatedOrganization <String>] [-PSSessionOption $ProxyOptions]
I would recommend putting this text in an editor like Notepad so that you can edit in your own information into the code before pasting it into PowerShell.
- UserPrincipalName is the full email address you are using to connect to the EXO environment, so you’d place that where it says
in the code. - ExchangeEnvironmentName is optional, so you can delete that bracketed section entirely. It would be used if you aren’t in a Microsoft 365 environment.
- DelegatedOrganization is also optional, so you can delete that bracketed section as well. You would use this if you were a Microsoft Partner managing a customer’s separate tenant, so that URL would go here.
- PSSessionOption is, again, optional, so you know what to do by now. This would be used if you were behind a proxy server (more info here).
So for most of you with MFA, all you will type in will actually look like, with your own email address inserted instead:
Connect-ExchangeOnline -UserPrincipalName user@contoso.com
If you DON’T use MFA, follow the steps starting here. Run:
$UserCredential = Get-Credential
Here you are creating a variable that will store your username and password. It will prompt you to enter them when you run this, so do that before proceeding. Then, for reference, this is the full code, but see the MFA example for which bracketed parts you actually need to include.
Connect-ExchangeOnline [-Credential $UserCredential] [-ShowBanner:$false] [-ExchangeEnvironmentName ] [-DelegatedOrganization ] [-PSSessionOption $ProxyOptions]
So as long as you are in a regular Microsoft 365 organization, not connecting for a Microsoft partner client, and not running a proxy, all you have to run is:
Connect-ExchangeOnline -Credential $UserCredential
As long as you didn’t get any errors, you are now successfully connected!
Now that we are connected to the correct EXO environment, we are going to use a cmdlet (a piece of code in PowerShell) to make it so our group is no longer hidden from the Exchange Global Address List. Complete details of the cmdlet we are using are here, but I’ll provide the main part you need to know.
Set-UnifedGroup has a parameter called -HiddenFromAddressListsEnabled, and you can either set it to $true or $false. By default, this is set to false (meaning the group is visible), but as mentioned, that isn’t the case when the group is created from Teams. For the record, if this was set to true, the group can get messages, but you can’t search for the group in Outlook or find it using the Discover option. Per Microsoft, “For users that are members of the Microsoft 365 Group, the group will still appear in the navigation pane in Outlook and Outlook on the web if HiddenFromExchangeClientsEnabled property is NOT enabled.” (source)
So what we need to do is change this parameter to $false. To do that, we need to identify which group we are talking about, call the parameter in question, and change that value to $false. This is the code you will need, though I again recommend pasting it in Notepad first so you can add in your own group name inside of the quotation marks:
Set-UnifiedGroup -Identity "Company Group" -HiddenFromExchangeClientsEnabled: $false
If it works and switches the value of that parameter successfully, the command line prompt will just come back up ready for you to enter another piece of code. If this wasn’t your problem and HiddenFromExchangeClientsEnabled was already set to false, you will get a yellow warning that reads something like: “WARNING: The command completed successfully but no settings of ‘MyListTest_e868c169-f00a-49fb-91bb-f067923eaea5’ have been modified.”
Luckily for our client, no errors or warnings appeared. Instead, the missing group appeared in Outlook for the client to use normally, and all it took was a few cmdlets!