
How To: Create a Name Pronunciation Database Using the Power Platform (now with samples links!)
Posted on September 30, 2022 • 7 minutes • 1457 words
Table of contents
The Problem and Requirements
I work at a medical research institute that is incredibly diverse. We have scientists from all over the globe, which can lead to some frustration on everyone’s part when it comes to the diverse names that these employees have. To be clear – it’s not just an issue of names that aren’t “American” causing “problems” – we have so many immigrant employees that even names that may seem straightforward, like “Lindsay”, can be confusing. Heck, as a former teacher, I know there are plenty of names from non-immigrant students that I had to write out a pronunciation guide for and practice saying.
For our annual Hackathon, one of our members (what we call our employees) suggested creating some sort of resource for hearing how other members say their names, like LinkedIn has. Having had to pronounce hundreds of unique names every year as a teacher, I jumped on this team as soon as I saw the idea posted.
Our requirements, being a Hackathon, were pretty wide open. How could we build something, anything at all, that would allow someone to know how to say someone else’s name? We discussed a pronunciation guide, but does a pronunciation guide written for a native English speaker work for a native Arabic speaker? Automating pronunciation was also considered, but what about people who say their names differently than any sort of automation would predict? For example, some people will pronounce my name as “Lind-sAy”, when I just pronounce it “Lind-see” because it’s easier (but don’t you dare spell it wrong – it’s my mother’s maiden name, okay!)
So, we wound up determining it would be ideal for each member to be able to record their own name pronunciation, so we could hear it exactly as they wanted us to say it. Along the way, keeping diversity, equity, and inclusion in mind as much as we could, it was also suggested that we could suggest people include their pronouns in their name pronunciation. By the way, saying “preferred pronouns” “suggests that any other pronouns used are acceptable” (thanks Steph Nowotarski!) – in case you weren’t aware!
The Solution
We knew that a Power App alone wouldn’t be the best solution, partly because Power App adoption is relatively low at the institute (so far…) and partly because we wanted it to be as straightforward as possible to access the recordings of the names, which is the most important part.
Our team decided that the best design for a solution would be a Power App that fed into a SharePoint Document Library, with a Power Automate flow fueling the population of the library. This way, we had a dedicated page in SharePoint, which we use heavily, that would allow the member to both record their name on the Power App and listen to the recordings in the Document Library.
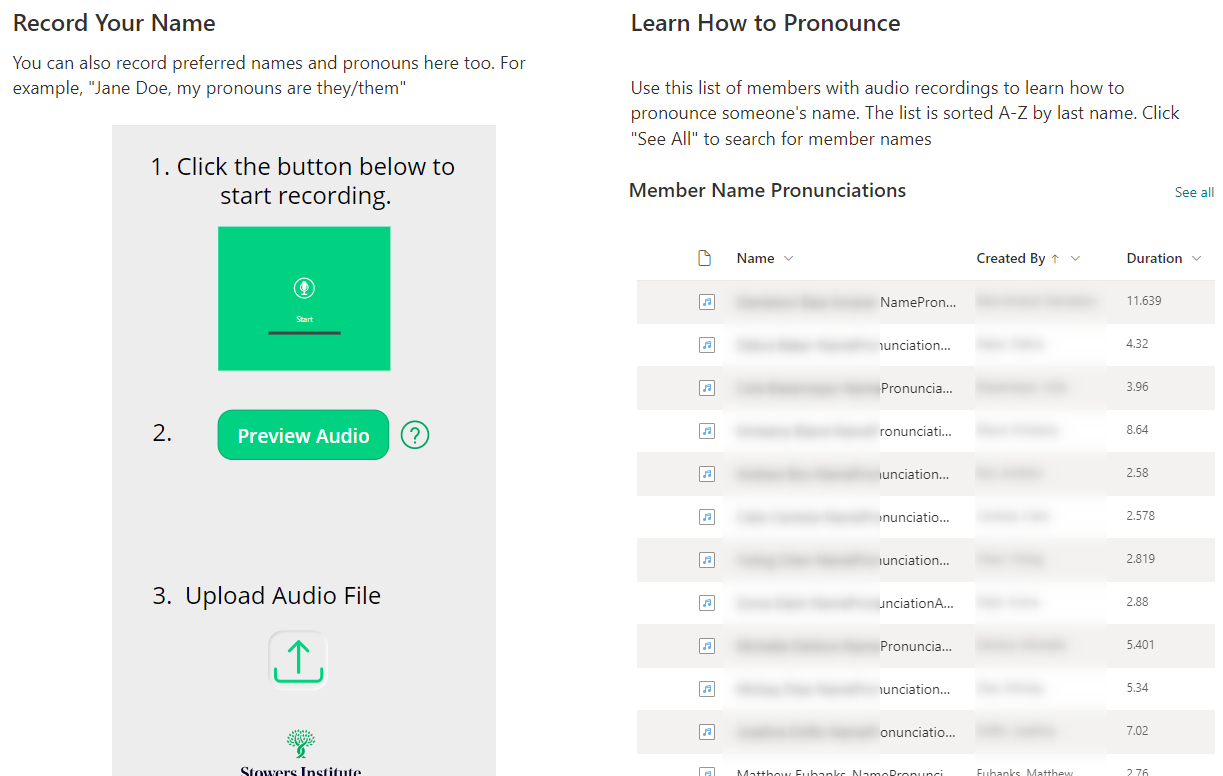
The full SharePoint page is much prettier with a heading image and links to a Help document (thanks Caroline!), but this is the meat of it.
The page itself is just a two column page with embedded web parts. On the left is the Power App I built, and on the right is a simple SharePoint Document Library. The member clicks the button (wish we could customize it, but couldn’t find a way to) to record their name and pronouns, and when they click Preview Audio, the audio file pops up for review before they click the neumorphic upload button (totally a stretch goal, but courtesy of the wonderful Kristine Kolodziejski here https://www.kristinekolodziejski.com/blog/building-beautiful-buttons-in-canvas-apps-part-1-neumorphic-buttons) .
The Power App
I am far from a Power App expert and previously I’ve built a whole one Power App that is in production, but I like a challenge and I love Power Automate, so I went to the Google and found some amazing resources to help me build out what we wanted.
It started with a Microphone control (Insert – Media – Microphone – see more here https://docs.microsoft.com/en-us/power-apps/maker/canvas-apps/controls/control-microphone) . All I did with this was change its color to fit our branding guidelines, add an accessibility label, and add a text box above it explaining what to do with it.
For the next step, this was an invaluable resource: http://powerappsguide.com/blog/post/how-to-save-and-work-with-microphone-recordings . As Tim Leung points out, while it’s not difficult to find the audio control and make it play what is recorded, it isn’t obvious how to actually save or do something with that recording. We don’t currently use Dataverse, which his blog states is the ideal data source, but it works just fine with SharePoint as our data source.
Now I was an English teacher and do understand the importance of citing your sources, but I can’t find the resource that helped me figure out exactly how to Collect that recording to SharePoint, but here is the code:
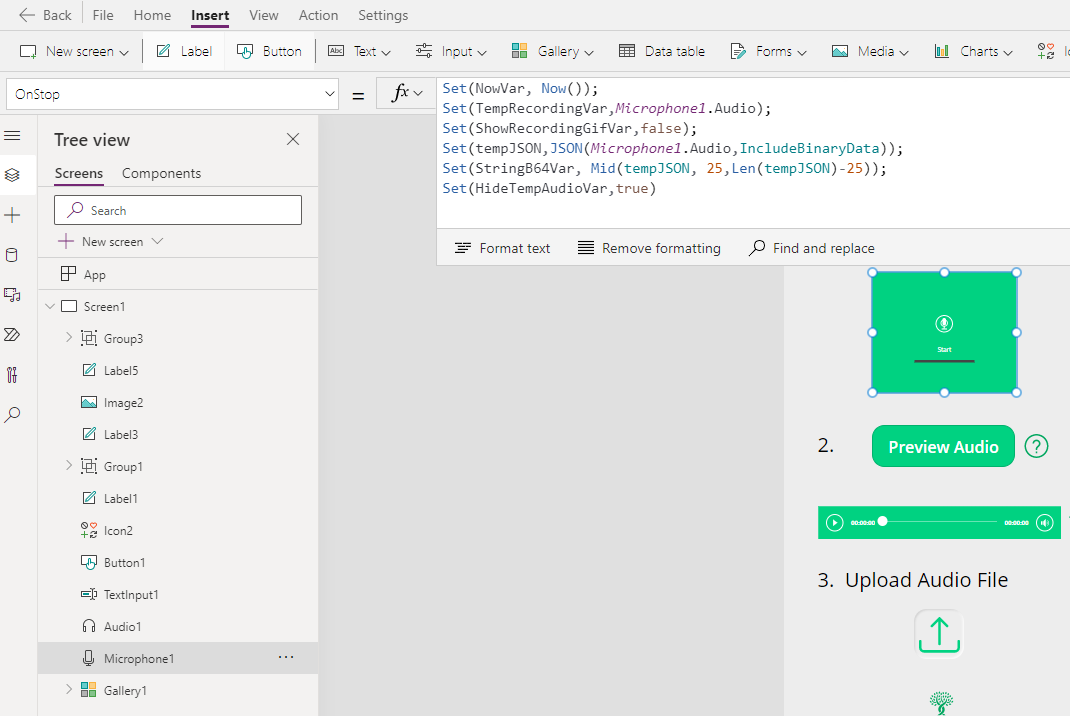
Set(NowVar, Now());
Set(TempRecordingVar,Microphone1.Audio);
Set(ShowRecordingGifVar,false);
Set(tempJSON,JSON(Microphone1.Audio,IncludeBinaryData));
Set(StringB64Var, Mid(tempJSON, 25,Len(tempJSON)-25));
Set(HideTempAudioVar,true)
So, when you stop recording, a bunch of variables get set. We set the time of the recording, the audio of the recording into TempRecordingVar, ignore the RecordingGif because that wasn’t working, we set tempJSON and StringB64Var for our Power Automate flow coming up, and honestly I need comments in Power Automate code because I don’t remember the purpose of the last variable.
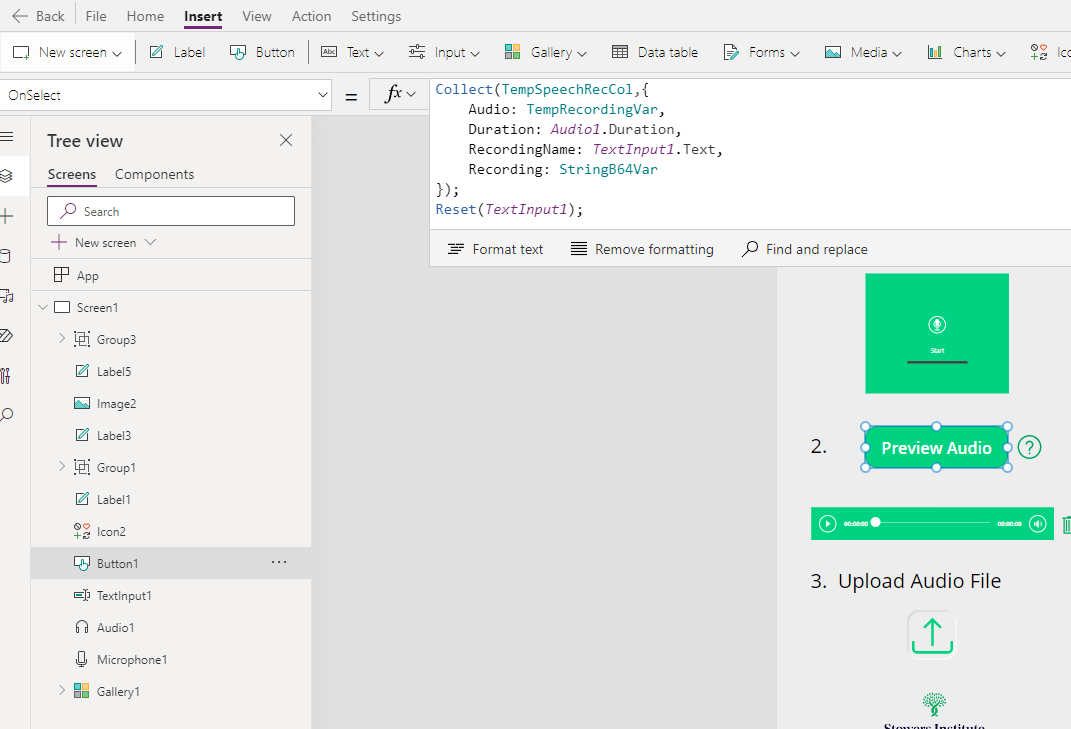
Collect(TempSpeechRecCol,{
    Audio: TempRecordingVar,
    Duration: Audio1.Duration,
    RecordingName: TextInput1.Text,
    Recording: StringB64Var
});
Reset(TextInput1);
Basically, we wanted this button to grab the recording and the conditions of it. The TextInput1 is a non-visible text input field with Default set to “User().FullName & “-NamePronunciationAudio””, so we define that the file name will always be set up in a certain way – like LindsayShelton-NamePronunciationAudio. The StringB64Var is a bunch of complicated stuff that I don’t fully understand, and if you can find my source for how I did it, I’d be happy to add it!
The audio control doesn’t show up until the Preview Audio button is pressed. Its Items control is set to “Last(FirstN(TempSpeechRecCol,1))” so it is going to show people the last recording they made. If they hit the trash button, the OnSelect is set to “Remove(TempSpeechRecCol,ThisItem);”.
There’s actually a Gallery component set up behind that audio control:
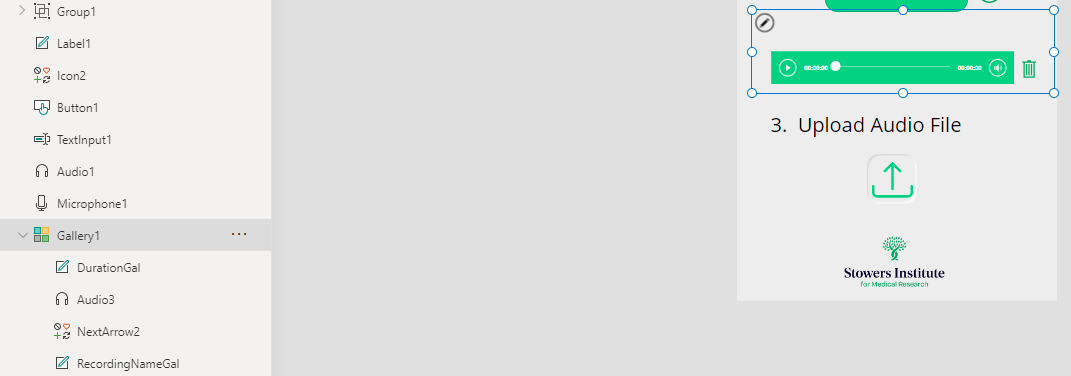
For the Upload Audio File button, the OnSelect is set to:
UpdateContext({pressedbutton: !pressedbutton});
ForAll(TempSpeechRecCol,SaveAudioFiletoSPO.Run(Recording, RecordingNameGal.Text, DurationGal.Text));
Some of that code is due to the neumorphic button (the UpdateContext), but the rest captures a few important variables and triggers a run of my Power Automate flow – something that I know how to explain much better than I know how to explain and document a PowerApp!
Two last things – I was striving to make this an accessible app, so I made sure to add accessibility labels on every component AND I used a Shane Young video (who hasn’t? https://www.youtube.com/watch?v=1tJk7LxgocA ) to create a popup help where the question mark icon is.
The Power Automate Flow
I created a flow with a Power Apps trigger, which I then later pulled into the Power App and called SaveAudioFiletoSPO.
Next I initialized a variable called Base64ToAudio, which takes a variable from the trigger body (triggerBody()[‘Initializevariable_Value’] and assigns it to my new variable:
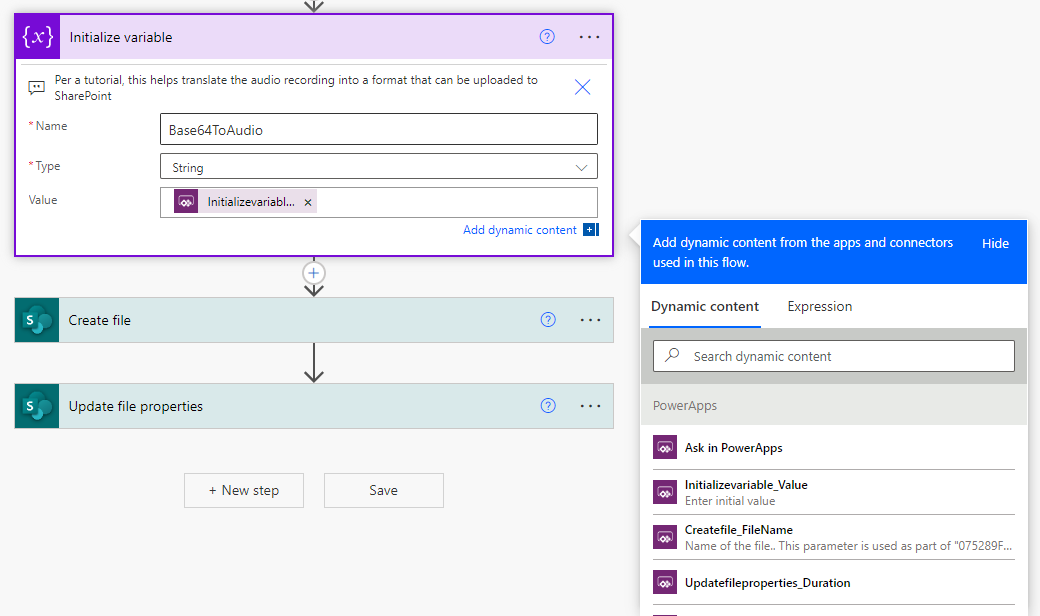
I then use a Create file block for a very basic SharePoint Document Library that I have set up. The only changes I believe I made to it were to change the Title column to “Name” and added a “Duration” column.
For the File Name, we have that stored in a variable from Power Apps – Createfile_FileName.
The File Content was the trickiest part, and a tutorial that I found (and can’t find again, arg!) actually had me do this in a way that didn’t work at first. I had to use PowerFX: base64ToBinary and fed it my new variable, so “base64ToBinary(variables(‘Base64ToAudio’))”.
Lastly, I added an Update file properties action, and simply added my last exported variable from the Power App – Updatefileproperties_Duration – to the Duration column I added.
Link to the Power Automate sample
Conclusions
Overall, I had an amazing team to help publicize and get feedback on this tool, so huge shout outs to Caroline, Sharon, Jessica, Jessie, Jenny, and Sherry.
How did the Hackathon go? Well…
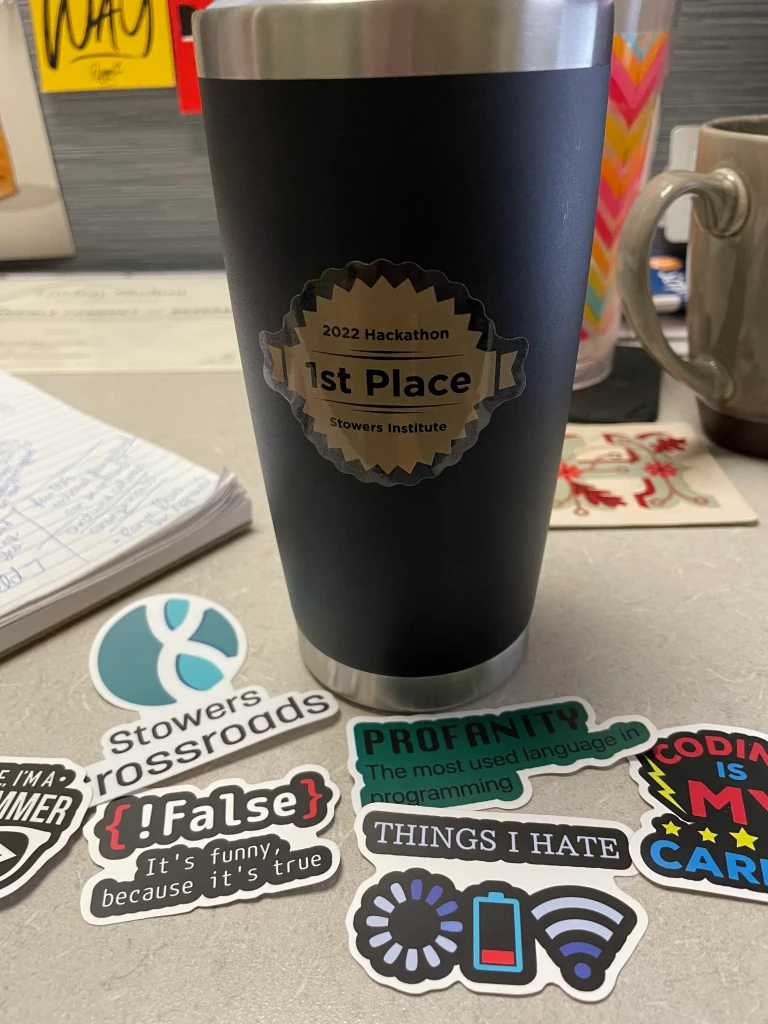
We won! The institute voted us as their favorite project, something I am very proud of! To date, we have gathered 55 recordings and hope to gather even more as time goes on and people see how valuable of a resource (we think) it is. We’ve received great feedback, all for a project that took a team of women only three days to get into production!
For us, this project was a valuable use of time, and I hope that this blog at least gets you started on the path to creating your own name pronunciation database (at least until Delve gets one added OOB!).