
Frankenstein’s Monster Error Handling for Power Automate Cloud Flows
Posted on January 26, 2023 • 12 minutes • 2350 words
Table of contents
Be warned now – the content in this post is not 100% from my own brain and genius. In fact, it is cobbled together from three different geniuses who were kind enough to post their own methods for error handling in Power Automate over the years. I’ve judiciously bookmarked those posts, just waiting for when I had time and motivation to tackle error handling in my own flows, and today was that day.
However, when it came time to actually implement one of the methods… it wasn’t quite doing it for me. Method one that I found influenced what I ended up with the most heavily, but it didn’t have my dream error adaptive card, so I checked out the other two options I had bookmarked. Method two actually posted the error message, which is what I wanted, but I couldn’t actually get it to work for me. Method three showed me how to pull the workflow URL so that I could link it from my adaptive card, making it easier at least to get to the error message.
So, I couldn’t have created my own version without the help from the three blog posts mentioned, but I thought others might find value in an updated, Frankenstein-ed together version of how I’m going to try handling errors going forward.
The Setup
I saw options in my research that called for the error notifications to come in a variety of ways, but none of them were really what I was looking for.
- Post the error to a SharePoint list, but then that would involve deciding where the list should go, setting up permissions, setting up notifications, setting up the list, etc. Seemed like more trouble than it was worth when I can also look at the flow runs in Power Automate itself, and I didn’t really have a need to look at errors past 28 days.
- Email the error to someone or a group of people. This definitely could have worked, but while I’m the primary Power Automate resource at my organization, this becomes problematic when trying to decide who else gets on the email. Then that person or persons are getting error emails when they really only need them when I’m out. Hard-coding email addresses in a bunch of flows also complicates things if I were to leave.
- Teams messages. This was tempting, but ultimately had the same drawbacks as the email messages.
So, I decided to go with a dedicated Teams channel that the flows will post adaptive cards into. That way, whoever feels the need to know about flow errors can turn on notifications on the channel quickly, and whoever doesn’t want to know can just hide the channel. Plus, adaptive cards are still new to me and I wanted to play with them some more.
The Basic Flow Structure
I may regret this when it comes to some of my larger flows, but I decided I want to try Norm Young‘s Scope pattern of Try, Catch, and Finally that he blogged about. It just looks cleaner to me, and it tells me very quickly which flows have been configured for error handling in this method and which ones haven’t.
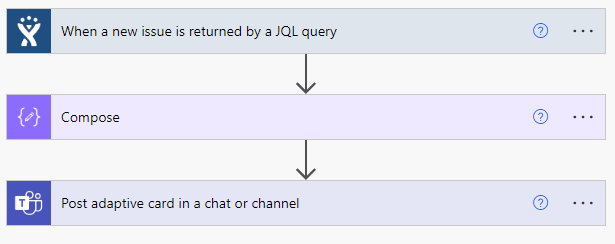
This is my flow that I’m adding error handling to today. It’s very simple – a trigger and one main action (told you adaptive cards were still new and exciting to me – this was my first use of them!), with a Compose action thrown in to help me determine which fields are sending back what that I will probably get rid of at some point.
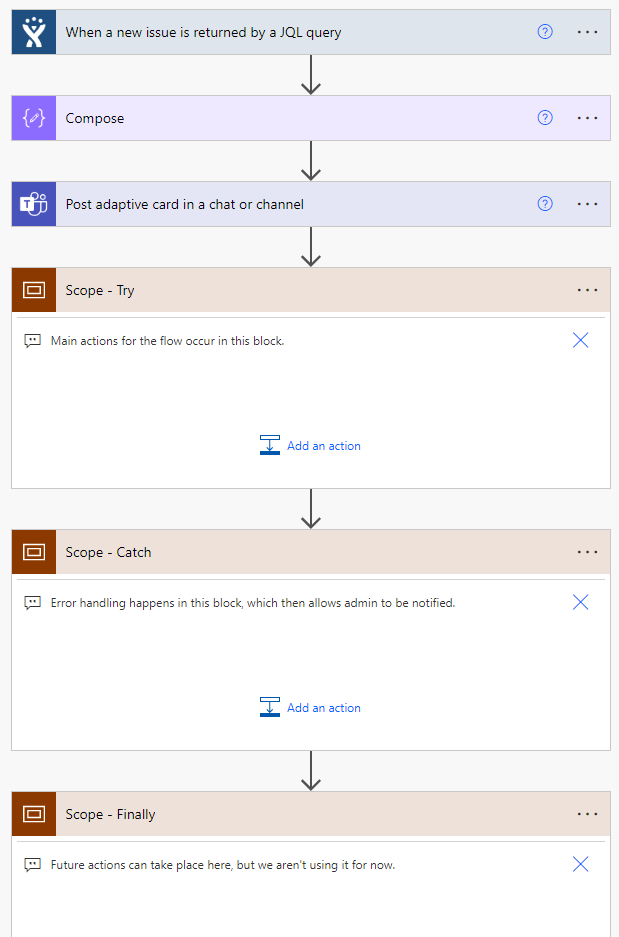
So, I went ahead and added three Scope blocks and renamed them to Scope – Try, Scope – Catch, and Scope – Finally. I also added notes explaining what each block does.
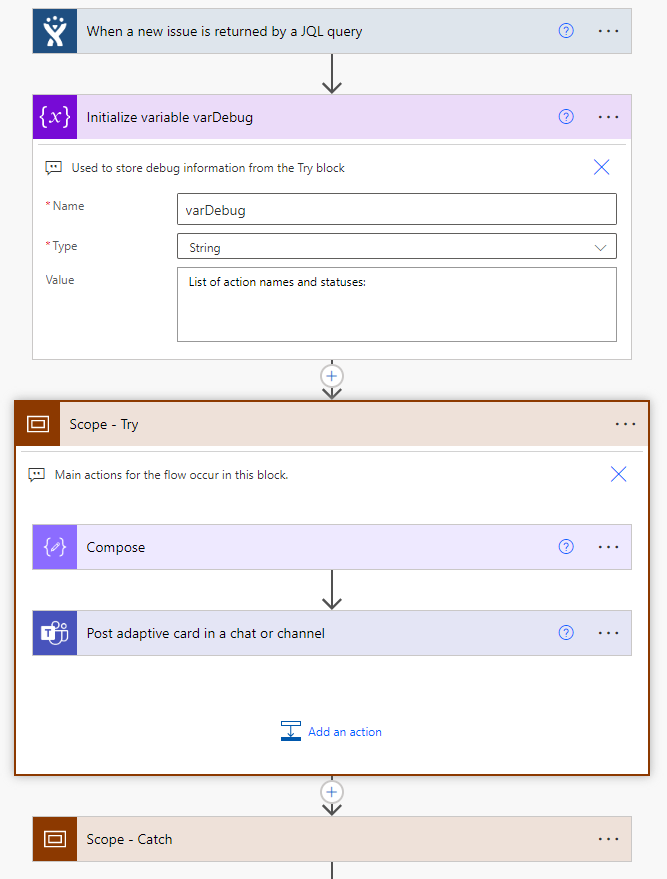
Now, I’m going to move my Compose and Post adaptive card in a chat or channel actions inside of my Scope – Try block.
I’m also going to add a block to Initialize variable varDebug and make it a string variable (anything with varDebug is also courtesy of Norm Young!). For the Value, you will want to set it to “List of action names and statuses” with a few returns after it, like in the image below:
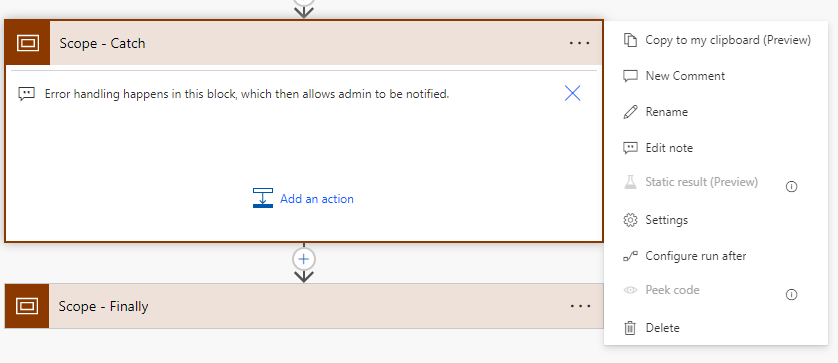
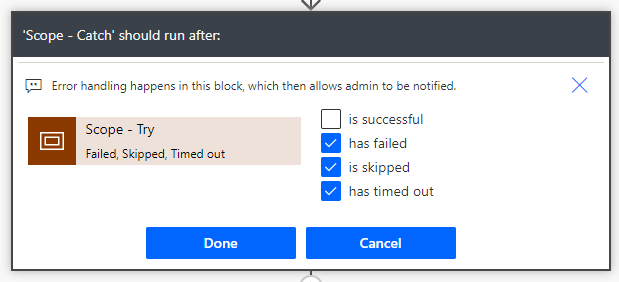
Now, we aren’t going to do anything else to the Scope – Try block, but we are going to do some configurations to the Scope – Catch and Scope – Finally blocks. Click the three dots on the right of the Scope – Catch block and click “Configure run after”.
UNCHECK the “is successful” box and check “has failed”, “is skipped”, and “has timed out”. Yours should look like the screenshot below:
You are going to click Done, and then do the same thing with the Scope – Finally block. Instead of unchecking “is successful” there though, you will just check all four boxes. We aren’t going to use that box in this blog, but it’s just good practice to get it set up as if we were from the start.
The Error Handling
Now it’s time to start setting up the actual error handling in the Scope – Catch block. Everything else we do will be in that block.
First, you are going to add an Apply to Each block. Where it wants you to input “Select an output from previous steps”, we are going to refer specifically to the output of the Scope – Try block. So, click in that text box, change from the Dynamic content editor on the right to the Expression editor, and paste in the following expression:
result('Scope_-_Try')
Note that this expression relies on how we named that Scope block – “Scope – Try”. If you name it differently, you will have to edit what is in the quotation marks in your expression to match.
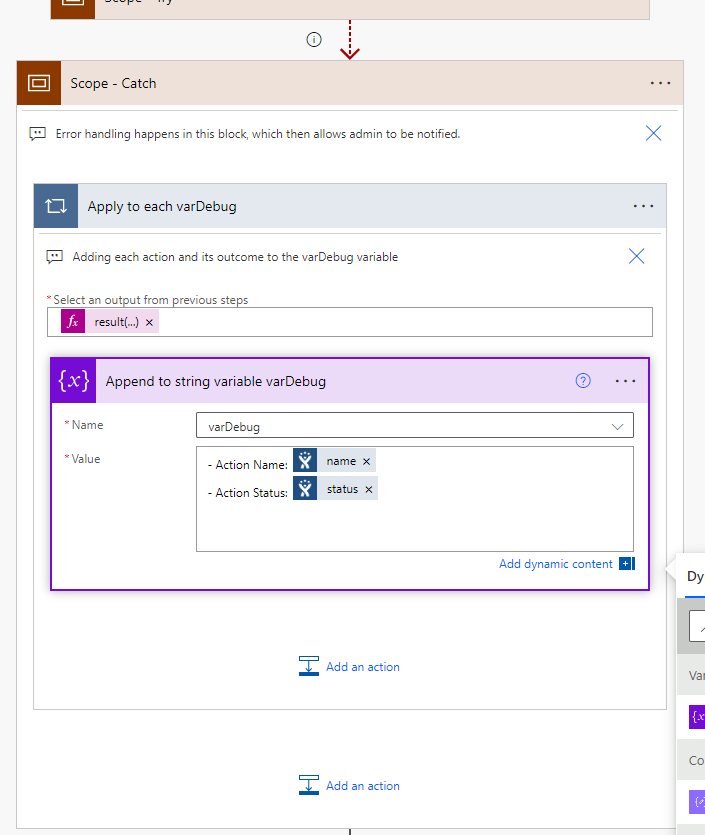
Now, the action we are going to add inside the Apply to each control loop is Append to string variable. You will select the “varDebug” variable as the “Name”. For the “Value”, we are going to have to put in two expressions mixed in with regular text. This is what we are going for:
Action Name: @{items(‘Apply_to_each_varDebug’)?[‘name’]}
Action Status: @{items(‘Apply_to_each_varDebug’)?[‘status’]}
This is honestly not my preferred way to do this. Basically, it will list each of our actions and whether or not they succeeded or failed which is fine. I would prefer to just get the error message itself, but one method was working for me and one wasn’t, so there is an obvious winner (the one that works!). Feel free to customize as you prefer, just like I ended up doing with the overall solution.
Your Scope – Catch block should now look something like this:
Don’t worry about the icons on the “name” and “status” expressions. They will look different for each person, I believe. Mine are the icons from my trigger, even though I’m not invoking my trigger here, so don’t ask me for the logic behind that.
You don’t have to do the next steps, but this was one of the smooshed-together things I wanted for my solution. I wanted a link to my flow run, so I created a series of Compose actions (which I then renamed and added some wording too in an effort to reduce confusion).
Note that this needs to happen OUTSIDE of the Apply to each action but INSIDE of the Scope – Catch block.
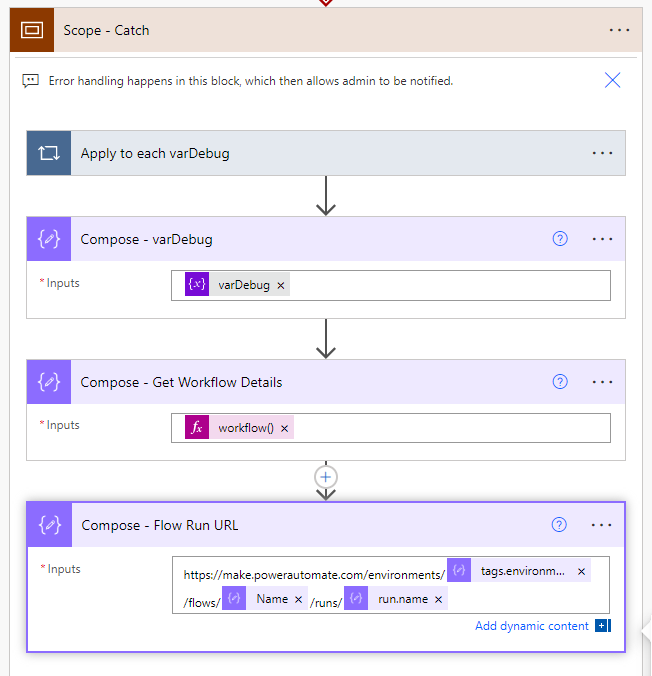
First Compose action is simply to store my varDebug variable, now nicely appended to with my list of actions and their status. So, for “Inputs”, just put the “varDebug” variable.
The second Compose action gets all of the workflow details. We are going to refer to this Compose action repeatedly in the third Compose action, so it’s going to be a lot easier on you if you name it like I have it named (but you do you!) For the “Inputs” value, go back to the Expression editor and put in:
workflow()
Don’t forget to click Ok to input your new expression.
The third Compose action is where we get fancy (and where we may have to update this blog as Microsoft changes these URLs, as I had to do when working from Matthew Devaney’s blog).
The code you are seeking is:
https://make.powerautomate.com/environments/@{outputs('Compose_-_Get_Workflow_Details')?['tags']?['environmentName']}/flows/@{outputs('Compose_-_Get_Workflow_Details')?['name']}/runs/@{outputs('Compose_-_Get_Workflow_Details')?['run']?['name']}
Like I said, if you name your Compose action differently, aka not “Compose – Get Workflow Details”, you just have to make adjustments to each time it appears in the formula.
All together, this is what your three Compose actions should look like/how they should be named:
The last block we are going to put in is the most complicated (at least at first glance), but you can also choose your own adventure here. For me, the last action I’m putting in is the Post adaptive card in a chat or channel block. Configuring the card is the harder part. Configuring where to put it is the easier part, as you can pick from a dropdown whether you want it to post as you, a flow bot, and whether you want it in a chat, a channel, or a group chat.
For the Adaptive Card JSON, you will want to customize that to your tastes. Here’s mine for a basis to work off of:
{
    "$schema": "http://adaptivecards.io/schemas/adaptive-card.json",
    "type": "AdaptiveCard",
    "version": "1.4",
    "body": [
        {
            "type": "TextBlock",
            "text": "Power Automate Error",
            "wrap": true,
            "isSubtle": true,
            "maxLines": 0,
            "weight": "Bolder",
            "color": "Attention"
        },
        {
            "type": "ColumnSet",
            "columns": [
                {
                    "type": "Column",
                    "width": "auto",
                    "items": [
                        {
                            "type": "Image",
                            "size": "Small",
                            "url": "http://store-images.s-microsoft.com/image/apps.24143.13592668300764735.55b49f05-a58f-437f-95f4-f51ea7542976.f30e5790-6318-41e4-86ef-6b813b3b2a17",
                            "horizontalAlignment": "Center"
                        }
                    ]
                },
                {
                    "type": "Column",
                    "width": "stretch",
                    "items": [
                        {
                            "type": "TextBlock",
                            "text": "@{workflow().tags.flowDisplayName}",
                            "weight": "Bolder",
                            "size": "ExtraLarge",
                            "spacing": "None",
                            "wrap": false
                        }
                    ]
                }
            ]
        },
        {
            "type": "TextBlock",
            "wrap": true,
            "text": "Flow error - please investigate.",
            "horizontalAlignment": "Left",
            "size": "Default",
            "weight": "Bolder",
            "color": "Attention"
        },
        {
            "type": "ColumnSet",
            "columns": [
                {
                    "type": "Column",
                    "width": "stretch",
                    "items": [
                        {
                            "type": "TextBlock",
                            "text": "@{outputs('Compose_-_varDebug')}",
                            "size": "Small",
                            "weight": "Default",
                            "spacing": "Small",
                            "separator": true,
                            "wrap": true
                        }
                    ]
                }
            ]
        },
        {
            "type": "ActionSet",
            "actions": [
                {
                    "type": "Action.OpenUrl",
                    "title": "Link to Failed Flow Run",
                    "url": "@{outputs('Compose_-_Flow_Run_URL')}"
                }
            ]
        }
    ]
}
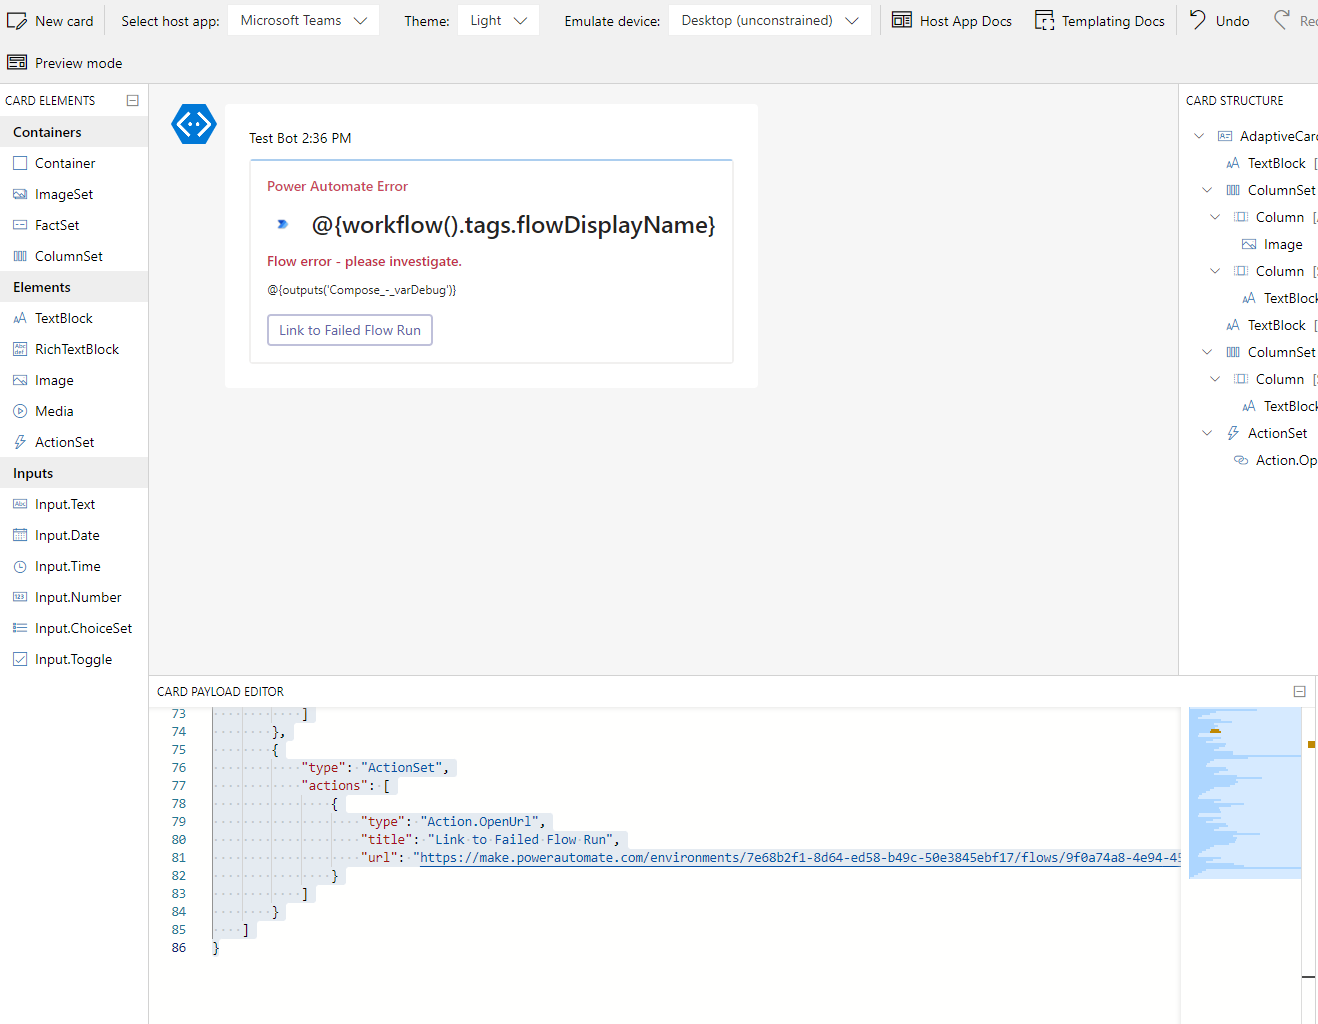
What I recommend doing if you want to customize this is, instead of just eyeballing it and testing over and over, copy/paste this into the Card Payload Editor section of the Adaptive Card Designer tool: https://adaptivecards.io/designer/ . It will look kind of funny because you are referencing variables that won’t show properly, but you can at least change the formatting and see where the variables are going to go this way.
Here’s what mine looks like, for an example:
Once you have tweaked the JSON to your liking, all that’s left is to save your flow and test it!
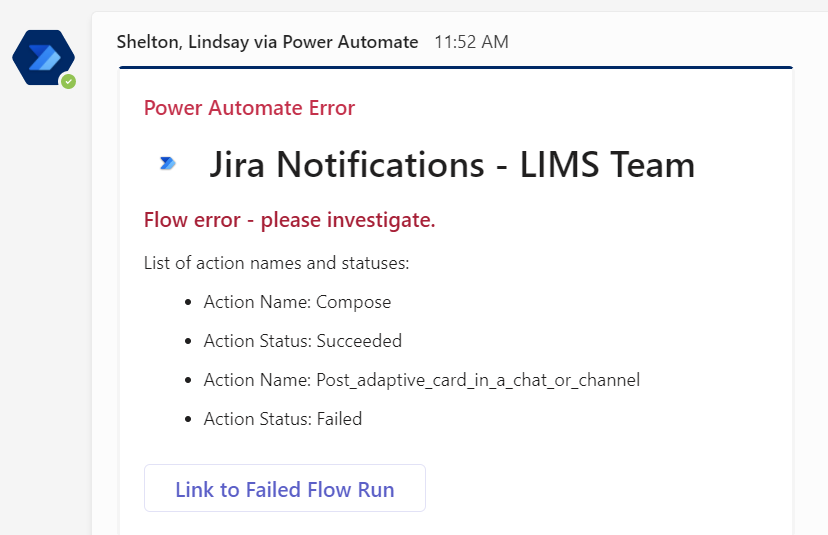
Here’s what my final adaptive card looks like in our designated channel:
The hardest part may be finding a flow with an error to test. Luckily for me, one of my newer flows had an adaptive card get cranky with quotation marks in a title (I can’t believe adaptive cards betrayed me in this way so early in our relationship!), so I was set for testing.
The Update - Using the Finally Block
After a great #MPPC23 where I got to meet and see sessions from both Norm Young and Matthew Devaney, I decided to update my error handling to include the Finally block. The main thing missing in my flow I’ve built here is the fact that, due to the Catch block, the flows will all show as “Succeeded”, even when they didn’t. The use of a Terminate block in the Finally scope will allow us to change that.
So, if you don’t already have a “Scope - Finally” block, go ahead and make one. Configure the run after settings by checking every single box - we want this to run whether the flow succeeded, failed, was skipped, or timed out.
In the Finally block, we are going to add two blocks (thanks to Matthew for the expression here). If you want to get fancier and grab the error message, it’s possible, but it involved a few more code blocks than I wanted to deal with on every single one of my Production workflows, especially when I grab the flow run URL and I can see the error pretty quickly.
First block - add a Compose block. We are going to make a little JSON here because we are going to use one Terminate block. Now, you could do a different expression and use some branching to build two terminate blocks based on Success or Failure, but Matthew Devaney has a way to do it all in just the two blocks.
In your Compose block, type the following:
{
    "status": @{if(equals(actions('Scope_-_Catch')?['status'],'Skipped'),'Succeeded','Failed')}
}
Change the code in the ‘Scope - Catch’ section to match the name of your Scope - Catch block.
Then add a Terminate block. For the required “Status” field, put in this expression (modify the name as necessary):
outputs('Compose_-_Flow_Outputs')?['status']
If you do the extra work to grab the error message, it can go into this block as well, but mine will be left blank. Now the flow will terminate as succeeded or as failed based on how the flow actually performend, NOT based on the outcome of the Catch block.
In Closing
I want to again give a huge shoutout to the blogs that were the original hosts for my Frankenstein’s Monster of Error Handling:
- Norm Young – Error handling in Power Automate using Adaptive Cards for Microsoft Teams – by far my biggest source
- Rik de Koning – Advanced error handling in Power Automate – some great tips, and while I couldn’t get the message working for me, maybe you will have more luck
- Matthew Devaney – 3 Power Automate Error-Handling Patterns You Must Know – Matthew also uses a shorter version of Try, Catch, Finally, but I mostly utilized his method for getting the flow run URL
I’m forever thankful for the people who post blogs with their solutions, and I can only hope that my version of a solution is a helpful one-stop source for someone else!