
Sending Flow Result Messages Back to a Power App
Posted on April 14, 2023 • 5 minutes • 925 words
Table of contents
 Bing AI Image Creator got a little weird, but let’s go with it. The others were far weirder.
Recently I was asked if I could add a success message to a Power App – something to indicate that they’ve clicked the button. I added a beautiful spinner and dusted off my hands, job well done.
Well, no, they wanted to know that the Power Automate flow that the button triggered had actually run successfully. This took me putting on my thinking cap, and ultimately, it was going through and tagging my older blog posts that made me realize that I knew exactly how to do this. Probably. Hopefully.
The Flow Setup
So I went through my existing flow and moved all of the pertinent actions into a Scope block – just search for it, it’s a type of control block that I talked about in my Frankenstein’s Error Handling post.
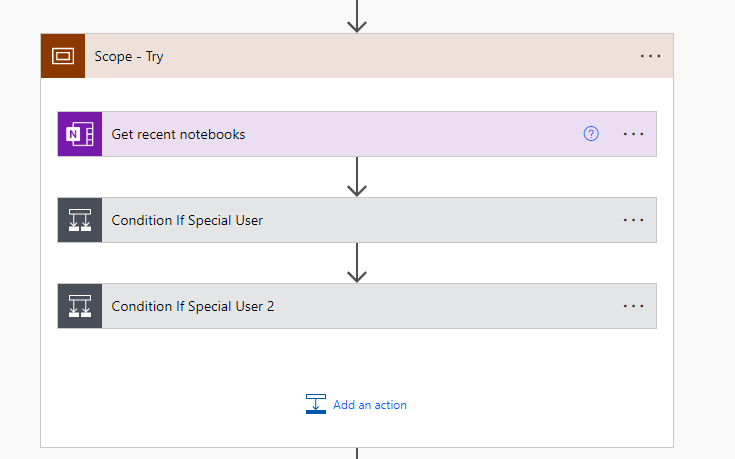
Note that not all of my blocks could go in here and that’s okay. Your Initialize Variables blocks, for example, cannot go inside scope. However, I only cared about the blocks that are liable to fail going inside the Scope block. I renamed my block to Scope – Try because this is what the flow will try to do.
Now, from here I made two more Scope blocks in a parallel branch – I added one and then click “Add a parallel branch”.
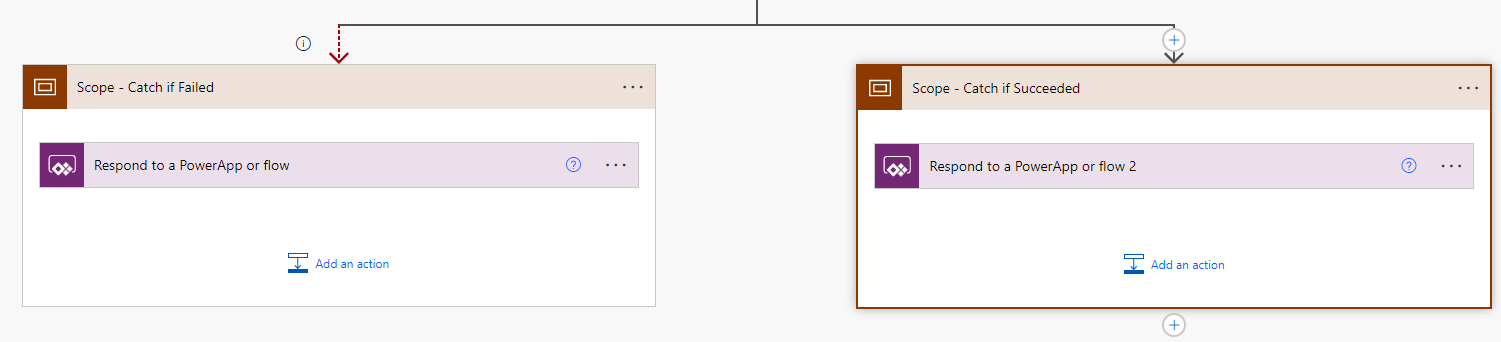
I really recommend renaming these Scope blocks to help you keep track of which is which. One will hold your response for if the Scope – Try works, and one will hold your response for if it fails. Left or right, doesn’t matter.
What matters is what we will do next, so make sure you match this to the correct side. Click the three dots on one of the Scope blocks (the one you are using to capture the failure) and click “Configure run after”.
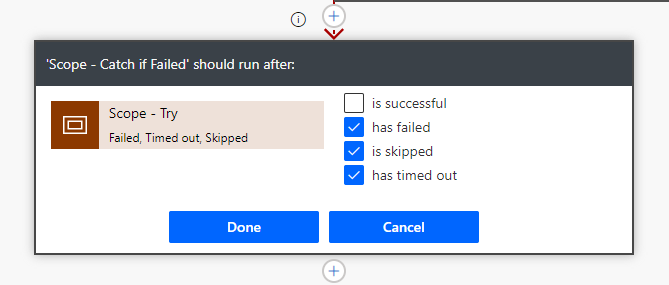
By default, the first box will be checked. UNCHECK “is successful” and CHECK the other three boxes, like in my screenshot. This will mean that whatever is in this Scope block will happen if the Scope – Try fails, skips, or times out.
Now, go to your other Scope block – the one you are using if it succeeds. Just for good measure, do the same thing – click the three dots, click “Configure run after”, and make sure that ONLY “is successful” is checked on this one.
The Scope Content
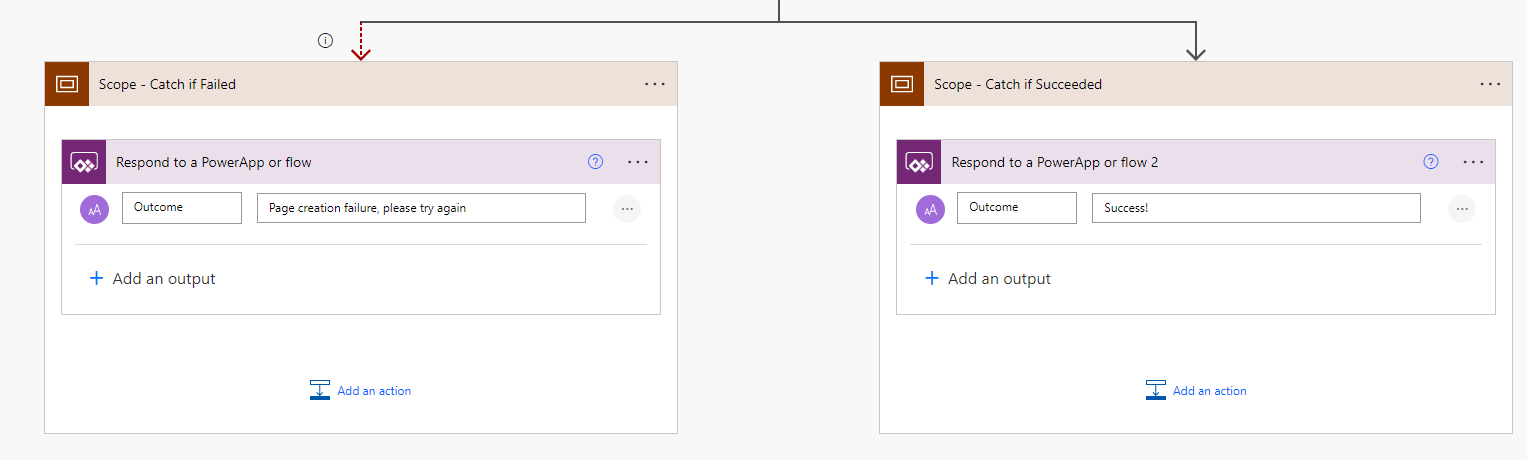
Now, inside each of your Scope – Failure and Success blocks, add the Respond to a PowerApp or flow action. Then, click that you want to add an output.
You can set this up how you’d like, but how I’d recommend is putting in as output the exact message you want users to see when there is a success or a failure. Important! Make the label name the same for both – I picked “Outcome”.
So in my Scope – Success block, I called the label “Outcome” and for the body, I put “Success!”. In my Scope – Failure block, I called the label “Outcome” as well, and for the body, I put a longer, more informational message: “Page creation failure, please try again”. Whatever you put here is what is going to show on your Power App directly.
Now we are done with the Power Automate part – it’s time to go to your Power App.
The Power App
The first change I had to make to my Power App was where I was running the flow. The initial formula for running the flow was this:
OKRAddOneNotePage.Run(JSON({Email:User().Email...AddDetails:varAddDetails},JSONFormat.Compact));
So I just had to add a little to the front and the end:
Set(varOutcome,OKRAddOneNotePage.Run(JSON({Email:User().Email,Goal:SelectedGoal.Text,KR:Title4.Text,Manager:varManager,AddDetails:varAddDetails},JSONFormat.Compact)).outcome);
I needed to set a variable, which I called varOutcome, to be tied to the flow run, and because I had those Respond to a PowerApp buttons, I was able to add the .outcome to the very end (which is why I wanted to name them both the same thing).
So now I have the outcome in my Power App – varOutcome – but I needed to show it to my user. I did this using a pop up.I
Also in the OnSelect when the button was pressed that started the flow, I added:
Set(varShowPopup, true);
This creates a variable, varShowPopup, and sets it to true as soon as that button is clicked. Now I needed to create the popup to be shown.
First, I drew a rectangle over the entire window, and I set the color to a more transparent shade of my theme. This is optional, but I like the signal it sends that there’s going to be something new on the screen to interact with before you proceed on with your business.
I then drew a second white rectangle, centered in the middle of the screen. This is the popup itself. I added a little X in the corner so it can be closed, and I put a text label in the middle. I set the OnSelect for the X icon to “Set(varShowPopup,false)” to actually close the popup.
Now for the text label, I didn’t put actual text in it. I instead set it to be “varOutcome”. Now the text is going to show whatever varOutcome is – whether it be my “Success!” message or my “Page creation failure” message.
I put these elements into a group (a container would probably work just as well) and for the “visible” property of the group, I set it to “varShowPopup”.

Hopefully Success! is what you will have with this method as well!