
Building a SharePoint SOP Library and Approval System
Posted on August 7, 2023 • 7 minutes • 1307 words
This might be several blog posts, as it’s documenting what I’ve been working on perfecting (ha! As if that’s possible) over the two years I’ve been at a medical research institute. One of my first big projects at my current position was building what I’m about to describe, and I’m building a new one as one of my current tasks, so it’s near and dear to me.
The Use Case
So we have various research support departments that have historically relied on Access databases to store their SOP documents - documents that very clearly lay out how exactly to do a particular action, procedure, or task with relation to their science. These SOPs are referenced regularly and also go through at least yearly review processes. They are also referenced by other departments, and so it’s important that they are kept up to date and are easily accessible.
As a result of working with these departments, they end up with their own SOP document library, hosted on a centralized site but with non-inherited permissions so that they are private to just that department. Each department has a variety of columns to store all sorts of metadata. There are then a series of Power Automate approval flows created, depending on each departments’ needs. The last flow that the manager runs wipes the approval records, stores them in a separate list (I’ll explain why later), and writes a copy of the fresly reviewed and updated SOP into the Institute Documents library for everyone to be able to access.
This could easily be adapted for any organization that has documents that need approval processes, especially a variety of types, around their work.
The Requirements
Gathering requirements is a really important part of this project, or any project, but I’ve found two meetings to be helpful here before getting started. In one meeting, usually shorter, I show the user some existing SOP libraries so they get an idea of what the options are. This helps also keep expectations reasonable - they generally then don’t ask me for much that is brand new, because they see what’s already there and luckily see that it will work for them. In the second meeting, I get a list of information from them that I then use to design.
The questions:
We will discuss your overall desired process for SOPs, including:

	· What columns are needed?
	· What approval(s) are needed?
	· Categories of SOPs
	· Views wanted
	· Any SharePoint groups needed?
	· Power App needed?
	· Archive option needed?
    · Private SOPs?
It’s not a formal process, but it’s what works for me and it guides how I’ll set up this Zebrafish library.
The SharePoint Library
The first thing I do is create a new SharePoint document library. The one I’m currently working on, and what I’ll refer to in this example, is Zebrafish. So, I go to the site I want my document library to be on, Institute Documents, then I click “New” and “Document Library”.
Remember to not put any spaces in the library name when you first name it! My library is actually named “ZebrafishSOPLibrary”, and then as soon as it’s named, I click on the gear in the upper right-hand corner, click “Library Settings”, and space out the name like I actually want it.
You might not need this next step, depending on your host site, but everyone at my office has access to the site I’m putting this on, so I’m going to need to adjust permissions right away. To do so, click the gear again (you’ll be doing this a lot) and click “Library Settings”. Then click “More Library Settings” to get to the actual menu. We are going to go to this a lot, so maybe leave it open in a tab.
Now you want to click on “Permissions for this document library”. You’ll see that it says “This library inherits permissions from its parent”. We don’t want that, so click the “Stop Inheriting Permissions” button. This will give you a scary warning, but we are going to ignore it. Click “OK”.
The reason we are doing this is because I don’t want anyone who can see Institute Documents to be able to see the Zebrafish SOP Library - it’s just for members of this department. So, I’m going to click “Grant Permissions” and add the group (or people, but groups are recommended) that I want to have access to this library. In this case, it’s the Zebrafish group. I’m going to give them “Contribute” permissions, which means they can add, edit, and delete items. The managers are going to need a higher level, however, so I’m going to individually add them and give them “Design” permissions. This is so that they can mark a document as approved, which is a part of the process near the end.
For two of my libraries, I actually manage permissions with custom SharePoint groups. You can make them by going to your main site, clicking the gear, clicking “Site settings”, and clicking “People and groups”. From here, it takes me to a group that already exists, but if I click “Groups” on the left, it takes me to all of the groups for that site. From here, I can add the new groups thatI want. The reason I’m adding groups is to manage voting on, or approving, the final SOPs. When I get to the flows for that section, you will see why we did this, but also works for assigning permissions to the Zebrafish library. We aren’t using SharePoint groups for this one, but still thought I’d share a little info on the why and how if you’d find them useful.
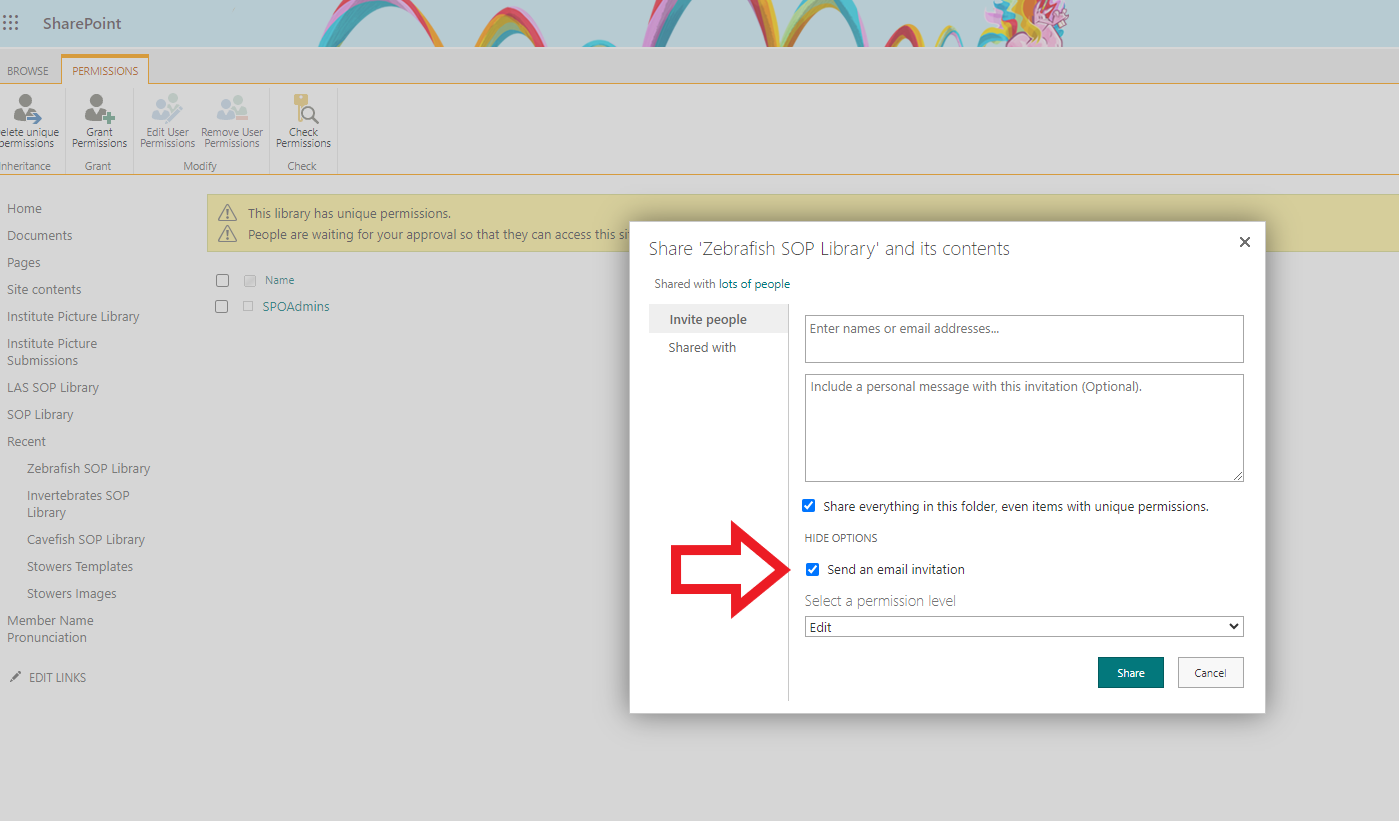
Also, for your own sake, uncheck this box immediately every time you go to share the document library. It’s an evil box and should always be unchecked, but that’s just facts.
The Columns
Some of the default columns that I use include:
- Category - choice column, default settings, list the categories of SOPs (that also defines a lot of the views)
- Completion Date - date/time column, default settings, this gets set when the final approval flow is run
- Review Date - calculated date/time column, default settings, this is set to be one year after the Completion Date so [CompletionDate] + 365
- For each type of initial approval: Supervisor Reviewer (people column, default settings), Supervisor Status (choice column, default settings, Yes, No, Pending are the choices), Supervisor Comments (multiple lines of text column, default settings) with wording differing between groups
- For the final vote: Approved By Vote (choice column, default settings, Yes, No Pending are the choices), Approved By Vote Record (multiple lines of text column, default settings)
- Write to Institute Documents - choice column, default settings, Yes, No are the choices
- Notes - single line of text, default settings, this is for any notes that the manager wants to add to the SOP
This is totally up to the group you are building this for, but I’ve found that these columns are pretty standard. I also have a few columns that are specific to the Zebrafish group, but they won’t impact the flows that I build. The main change is adding a column called “Number of Days Between Reviews”. They have a lot of SOPs that aren’t on an annual cycle, so they are going to maintain this column. The Review Date calculated column then uses this column instead of the default 365. Instead, the formula is =[Number Of Days Between Reviews]+[Completion Date].
Part Two
I’m not sure if I can wrap this up in Part Two, but coming soon (I hope) will be an overview of the flows that I use and their structure. One of them is even in the PnP Samples gallery for your use!
Update
I did wrap this up in Part Two! Enjoy!