
Automate Sending Out Feedback Using Power Automate Desktop
Posted on October 13, 2023 • 9 minutes • 1818 words
Table of contents
If you didn’t know, I spent the first 10 years of my career as a public middle school teacher. It was a dark time, but one of the brightest lights of that time was my best friend Emily, who I met halfway through my stint as a teacher. She’s still teaching, and today on the phone she said, “Hey, so I was playing around in Word today and I saw a button that said Power Automate… that’s what you do, right? Can I do things with that?”
With a joyful spring in my metaphorical step, I responded in the affirmative, and together we cooked up a great use case for teachers everywhere. Emily teaches MTSS and has a ton of data - data that she’d like to be sending out to parents and guardians. However, it’s an overwhelming task to take everything she’s got in her Excel spreadsheets and get it out in emails on top of classroom management, professional development, other communication with colleagues and parents, and, you know, teaching. So, we’re going to automate it.
I’m going to walk you through how to set up a Power Automate Desktop flow that will take a list of students, their email addresses, and their grades, and send them an email with their grade and a personalized message. This is a great way to send out feedback to students and parents/guardians, and it’s a great way to get started with Power Automate Desktop.
The Use Case
So, Emily has Excel spreadsheets full of data. I don’t have her spreadsheets, so I’ve just made a little one with a table/headers with my diligent fake students:
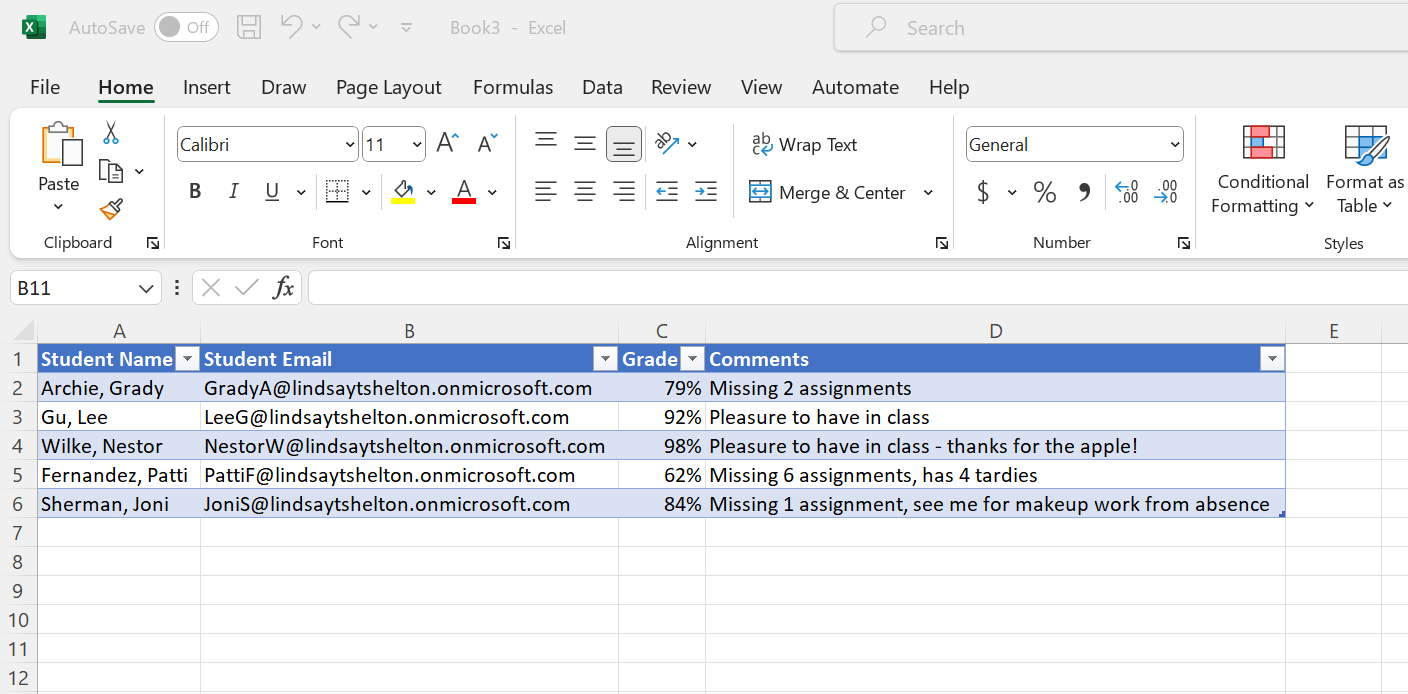
You can do this with whatever data you want - it doesn’t have to be formatted like this by any means, but you will want to have a column with the emails you want to send things to at least.
CHECK IF IT NEEDS TO BE IN A TABLE
Using Power Automate Desktop
Power Automate Desktop is, perhaps unsurprisingly, a desktop application. You can download it here. Don’t ask me about the licensing involved - I just know I’m able to make flows using my free dev account. There’s more information about restrictions here.
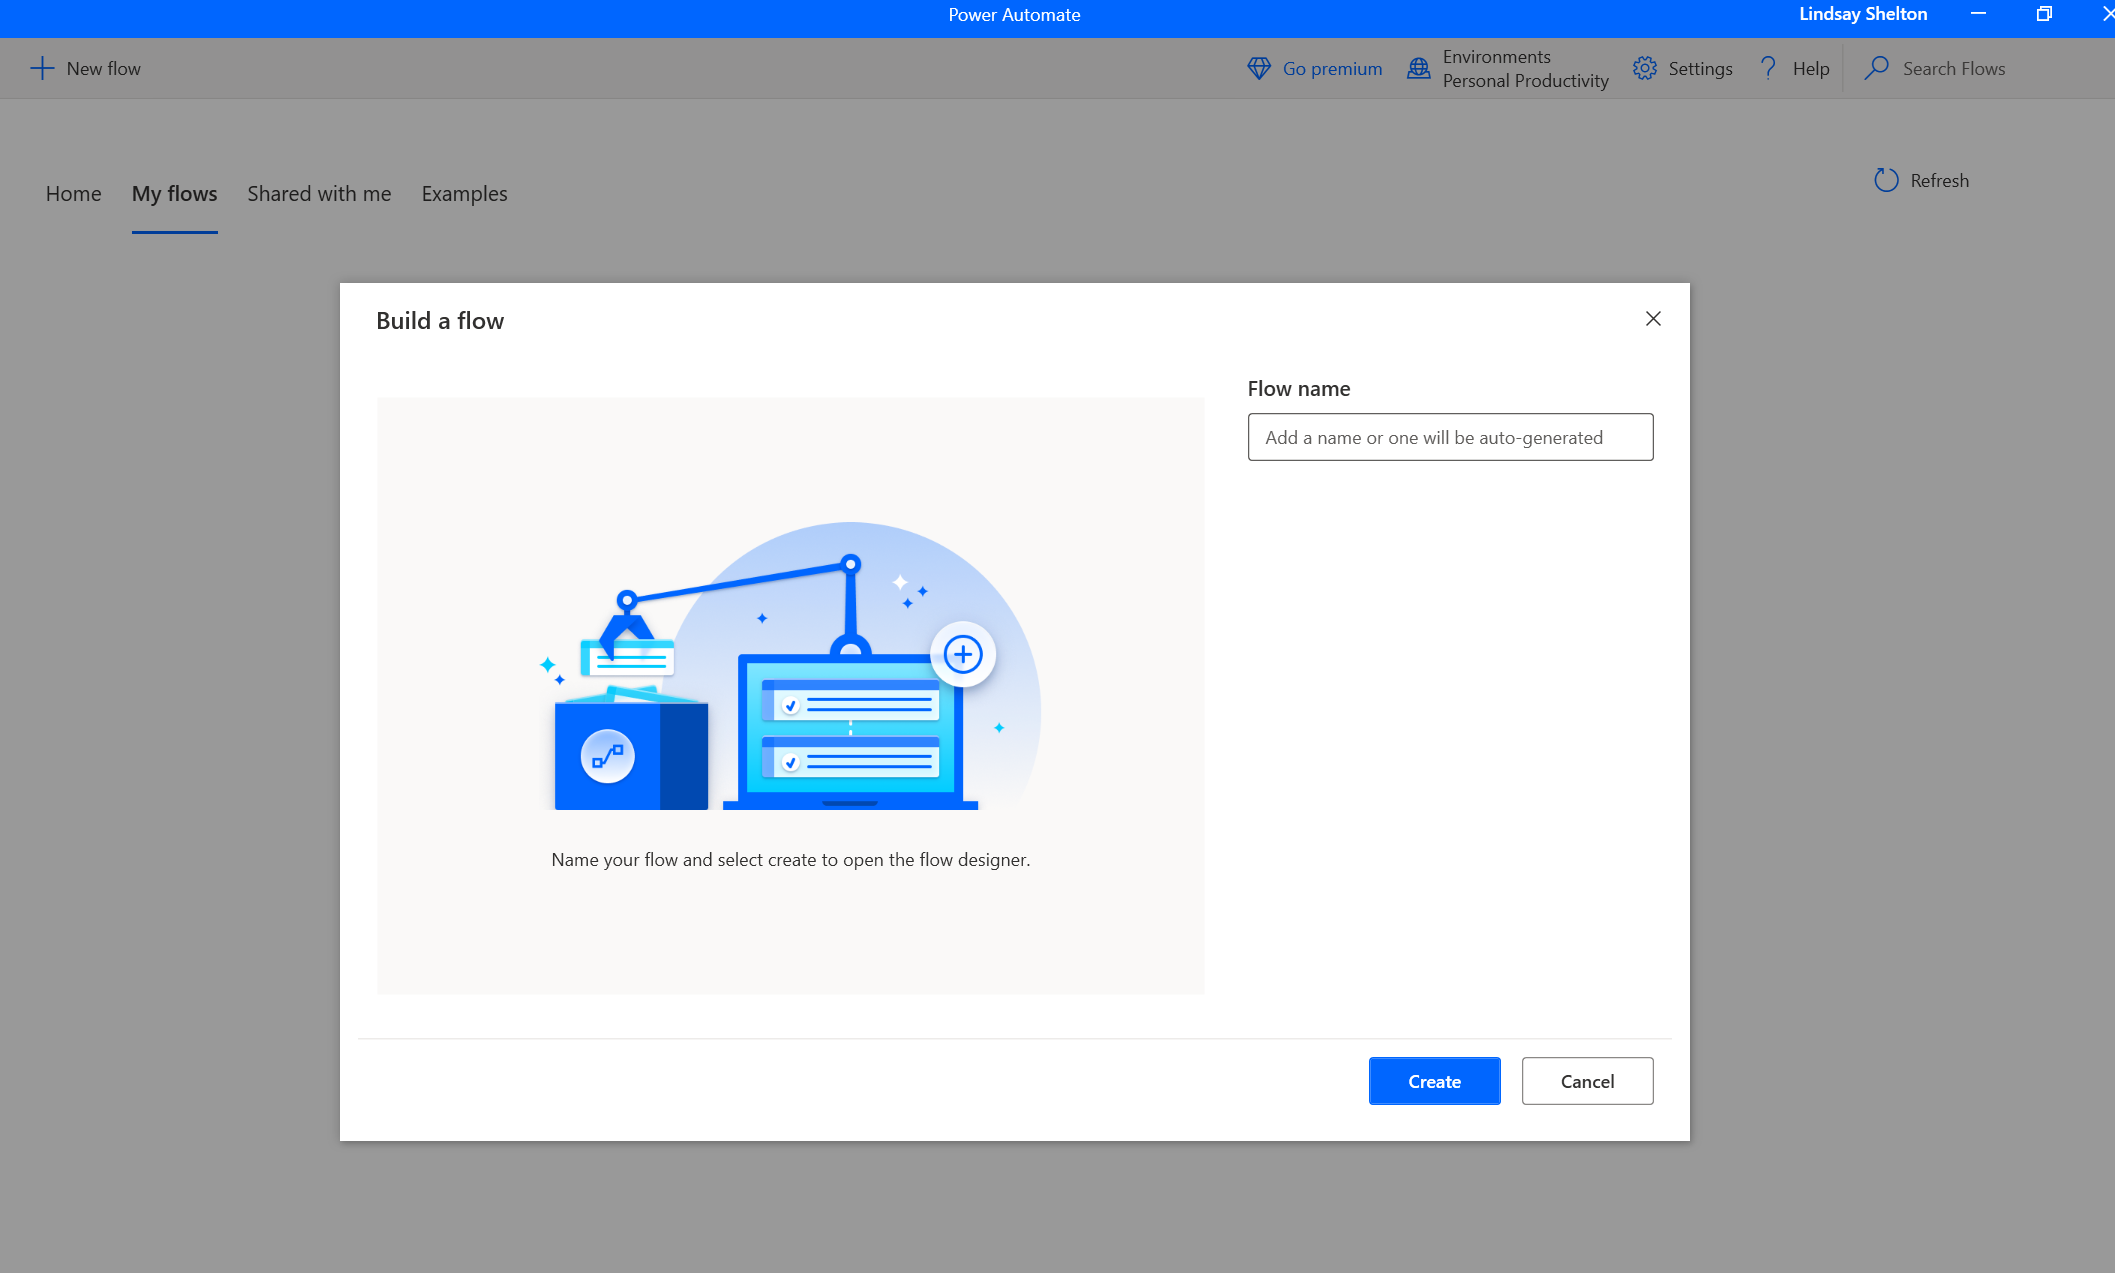
Once you’ve downloaded and installed Power Automate Desktop, you’ll be able to open it up and get signed in. Click to make a new flow and give it a descriptive name.
It will open the flow in a separate window and it looks like this - don’t worry, I know it’s overwhelming at first, especially if you’ve only built cloud flows:
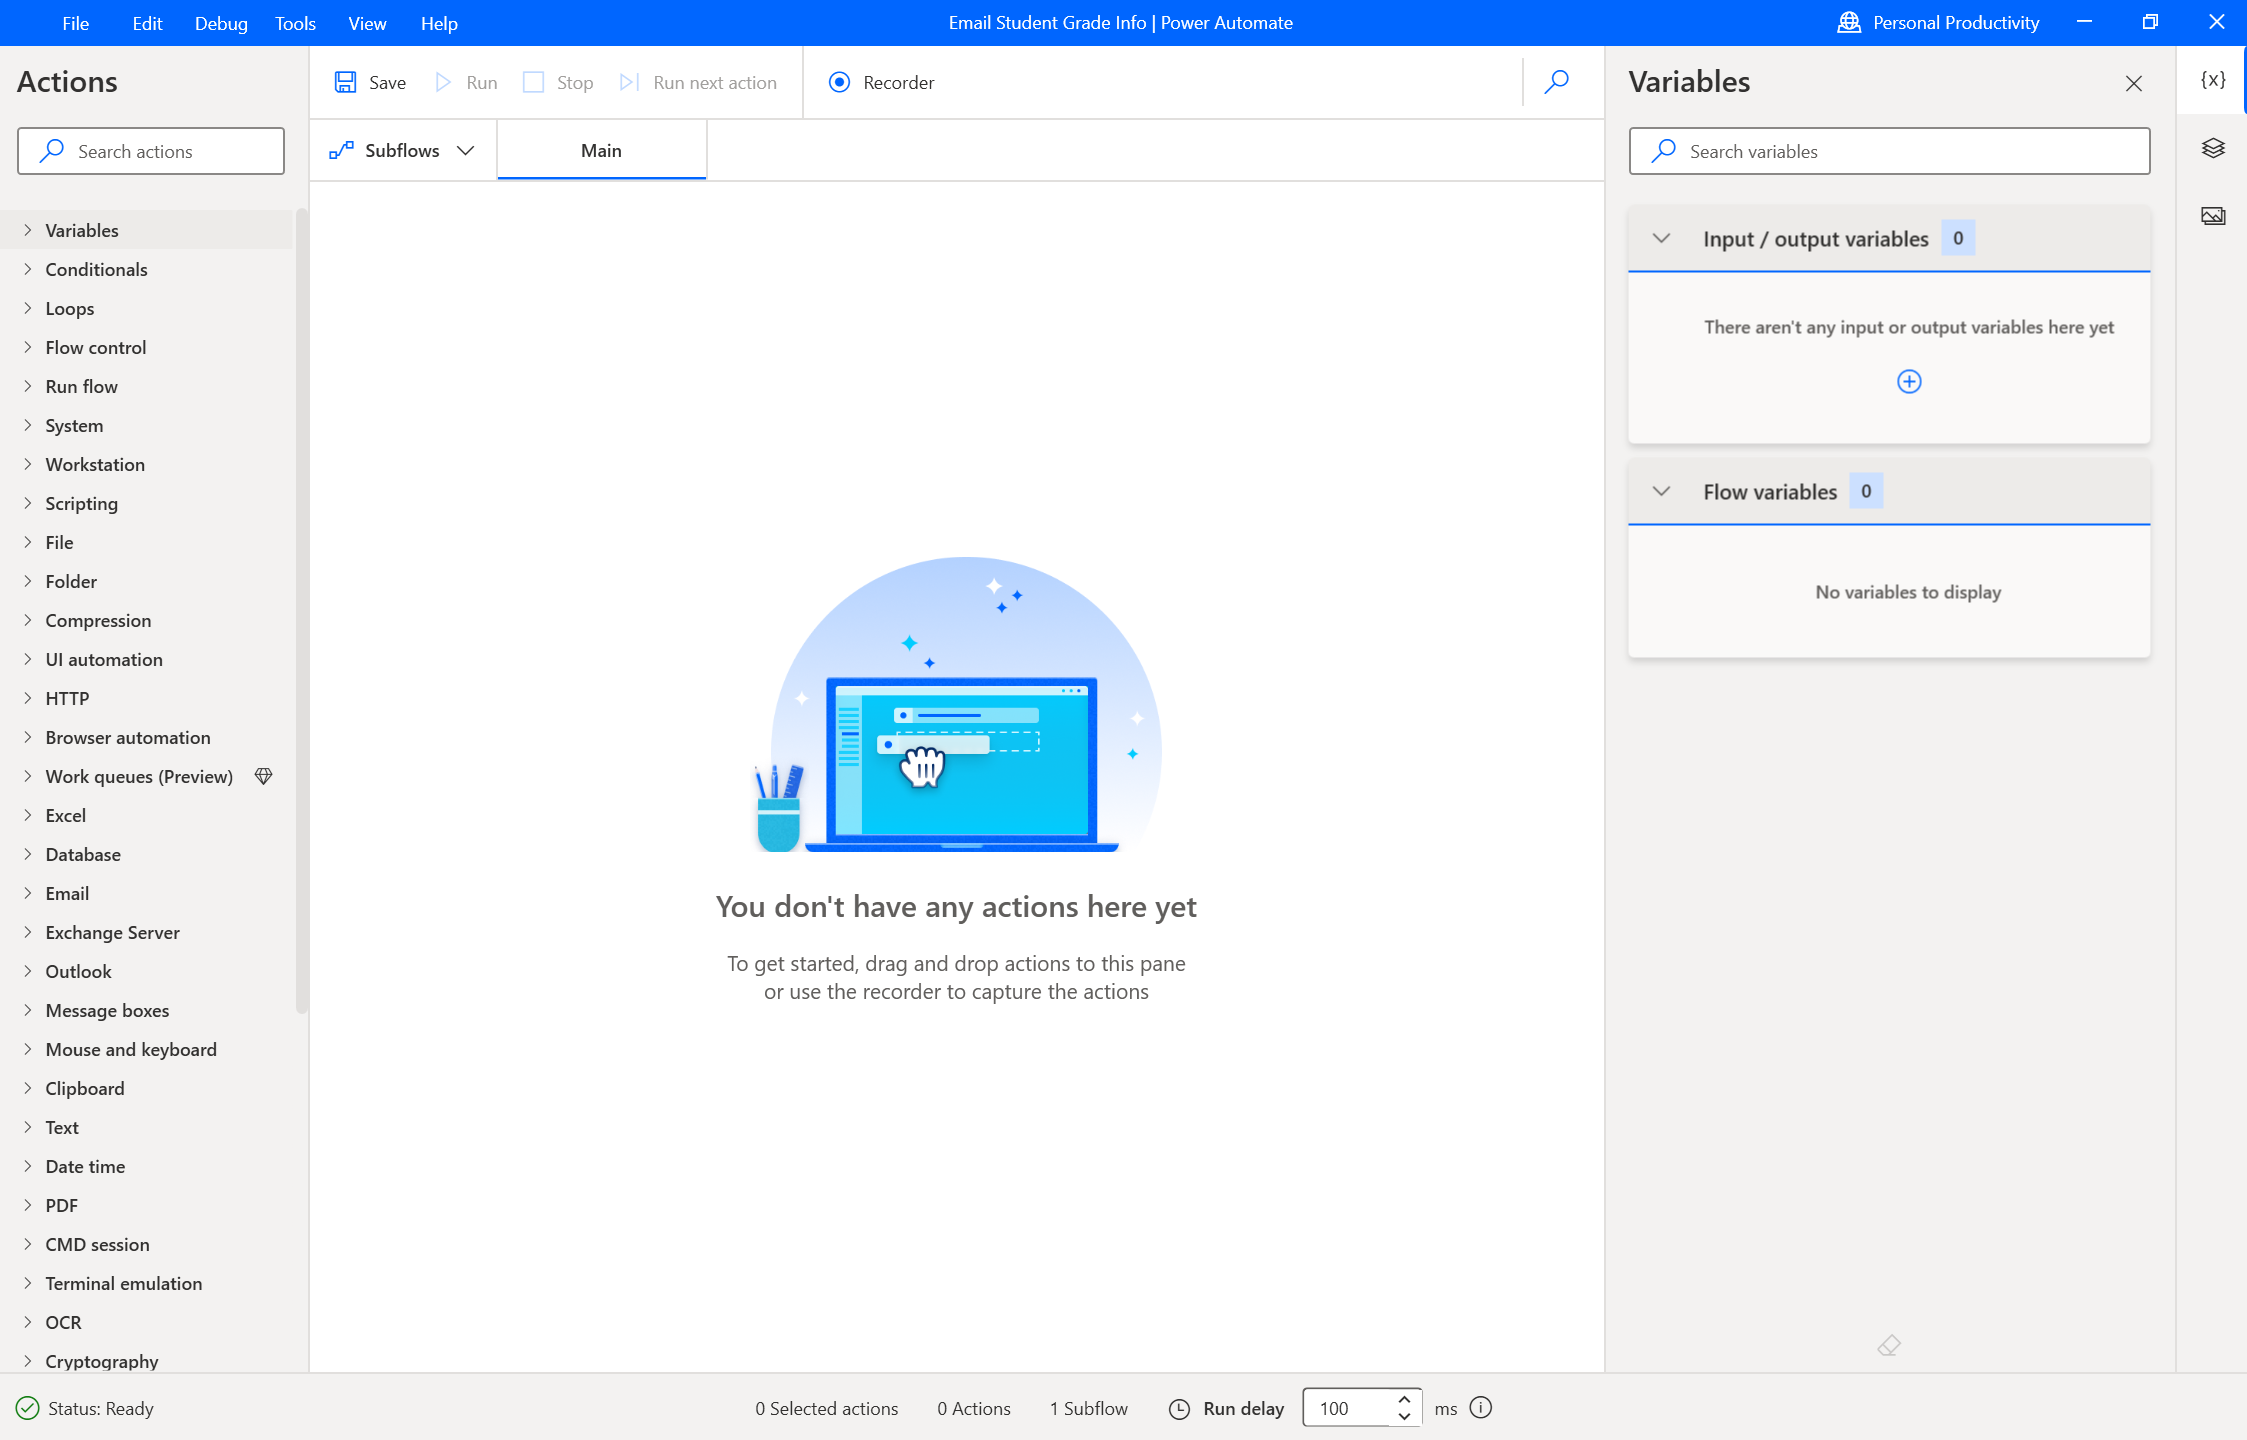
Let’s do a little tour of what you need to know first. At the top, you have your save button wh ich is important, along with a menu bar. Along the left are your action options - you can search using the box at the top or just expand by category to look at what is there. The right side will fill in as you go, but that is where you can see your variables and see what they are set as when doing a flow run. This will be important when checking your flow for errors before sending out the actual emails. The middle area is where you will do the bulk of your work - this is where you will drag and drop actions to build your flow.
Building the Flow
To start with, we want an action to launch Excel and to launch Outlook - you will want those open for reading your values and then sending the emails. Expand the “Excel” category on the left and you will see “Launch Excel”. Double-click it to add it to your editor.
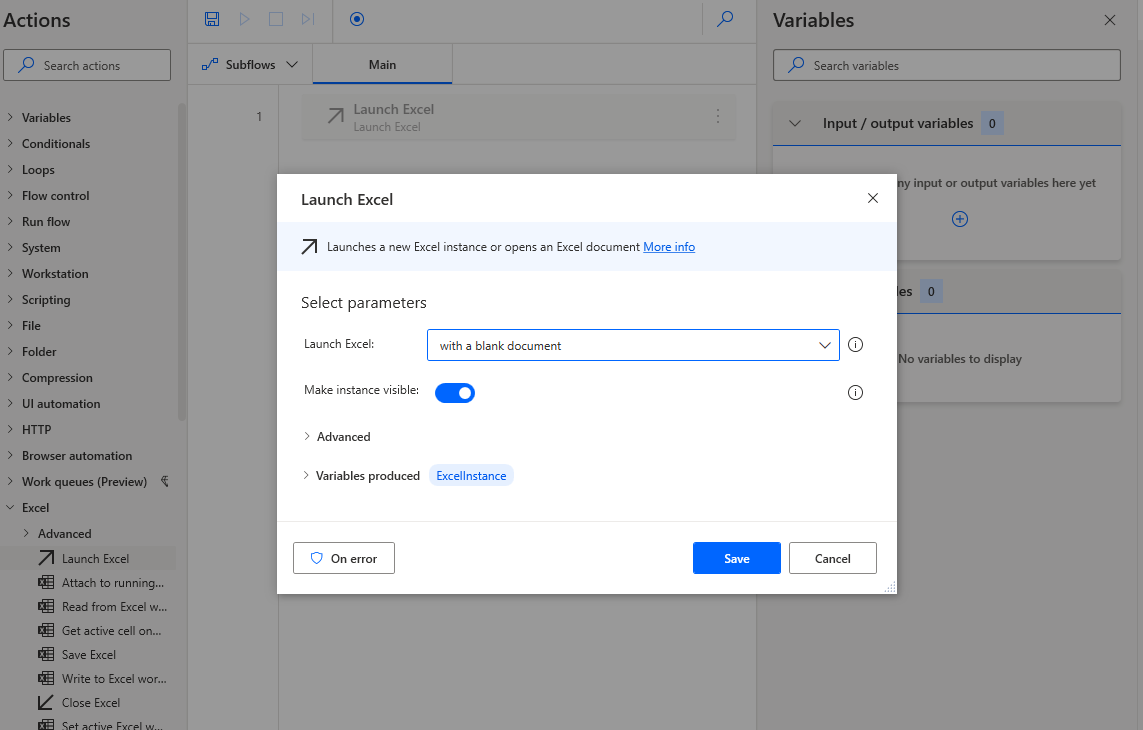
When the action is added, you will see a little pop-up that asks you to select the Excel file you want to open. Click the dropdown where it says “with a blank document” and change it to “and open the following document”. Now you will have a “Document path” field where you can click the little folder icon to browse to your Excel file. Select it and click the blue “Save” button. Note that the file has to be closed before you can select it.
We are going to do the same thing for Outlook - expand the Outlook menu on the left, double-click “Launch Outlook”, and this time leave the options as they are. Go ahead and click the blue “Save” button.
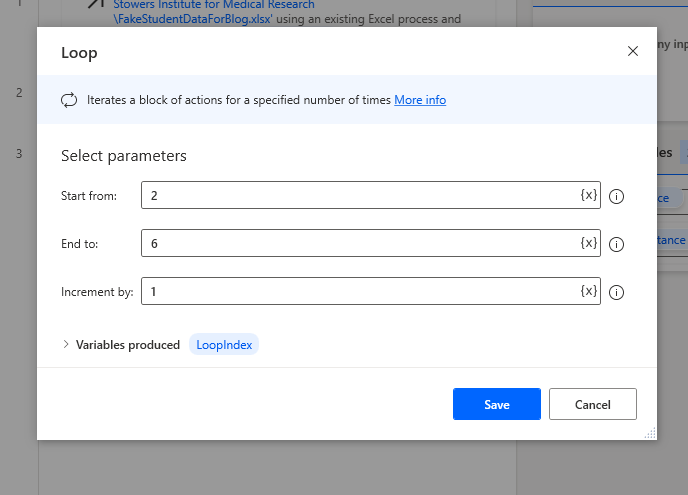
Now we are going to get a little fancy. The whole purpose of this flow is to send a bunch of emails, so we will need a loop that reads through the fields we tell it to look at, sends the email, and then loops through again and again so it does that for every row that we have. Expand the “Loops” menu and double-click (or drag over) the “Loop” action.
Keep in mind that we can change these configuration as we go, but we will want this to start from the first row that has data - row 2 if you have headers, and stop on the last row with data. My table, as you could see from the screenshot, has 5 rows, so I want my loop to start from 2 and end to 6, incrementing by 1. Customize yours for your data, but if you have headers, it will start at 2 and it will increment by 1 - the only thing you should have to change is the value of your last row. Click “Save”.
Now every subsequent action we made will need to go inside of this loop - you should be able to see that it has a thin turqouise line connecting the start and the end of the loop, and it will expand as we add actions inside of it.
Next we want to start collecting the data and storing it in variables. Those variables will be what we then insert into our email template on the last step so that we can customize and personalize what email is going out. For these next actions, because they are going inside the loop, it is going to be easier to click and drag them in between the start and end of the loop to make sure they get placed correctly, though you can move them once placed.
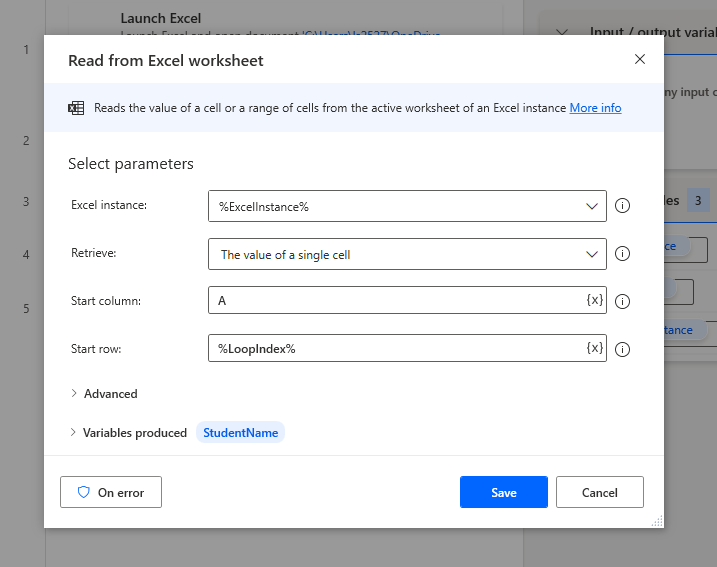
Go back to the Excel category on the left and drag over the action “Read from Excel worksheet”. We are going to use this one a lot. Leave the first two parameters alone. For “Start column”, put in the letter of the column that you want to grab info from and store into a variable. I’m going to start with Student Name, so that’s column A for me.
For “Start row”, we don’t want it to start on just one row - we want it to start wherever the loop is. So instead of putting in a number here, click the {x} icon and select “%LoopIndex%” - the %% designate variables in Power Automate Desktop.
The last thing we want to change is the name of the “Variables produced”. We don’t want to just call this “ExcelData” - that’s too vague. Click the blue text where it says “ExcelData” and change it to something descriptive - mine is going to be “StudentName”. I know that’s a little confusing - here’s what mine looks like right before I click “Save”:
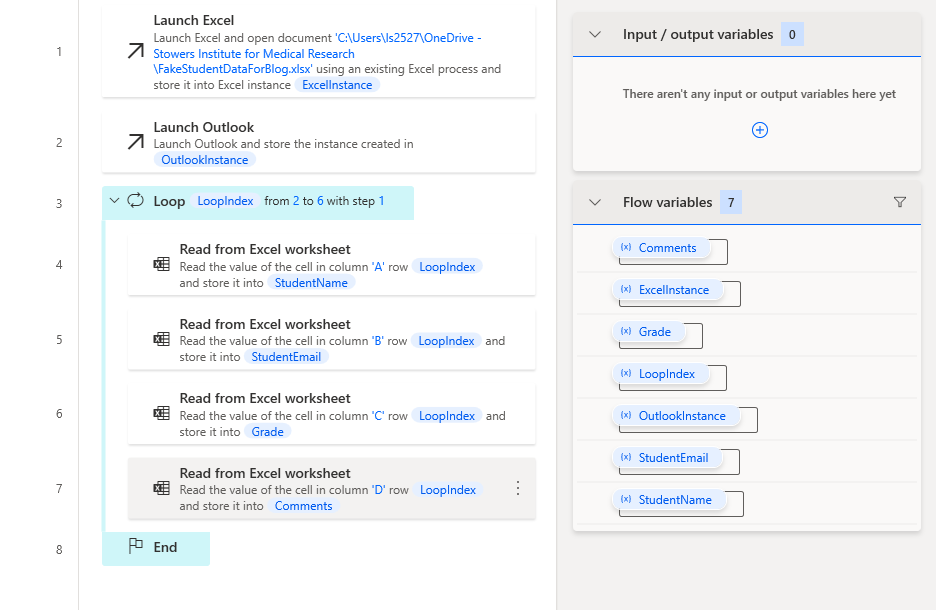
You are going to then repeat what you just did for every column you want included in the flow (it doesn’t have to be all of them). For example, if I didn’t care about sending out Comments, I just could not make an action to read that value and store it in a variable. I’m going to do it for all of them, though, so I’ll have a variable for StudentName, StudentEmail, Grade, and Comments. Here’s what mine looks like when I’m done assigning variables:
Lastly, (you are so close!), we need to make an action to send the email. Go back to the Outlook category and drag over “Send email message through Outlook”. For “Account”, put in your email address that you are signed in with. For “To”, you WILL end up clicking the {x} icon and select the variable you created for StudentEmail. However, because I’m paranoid, we are going to test this first - just put in your email address again for now.
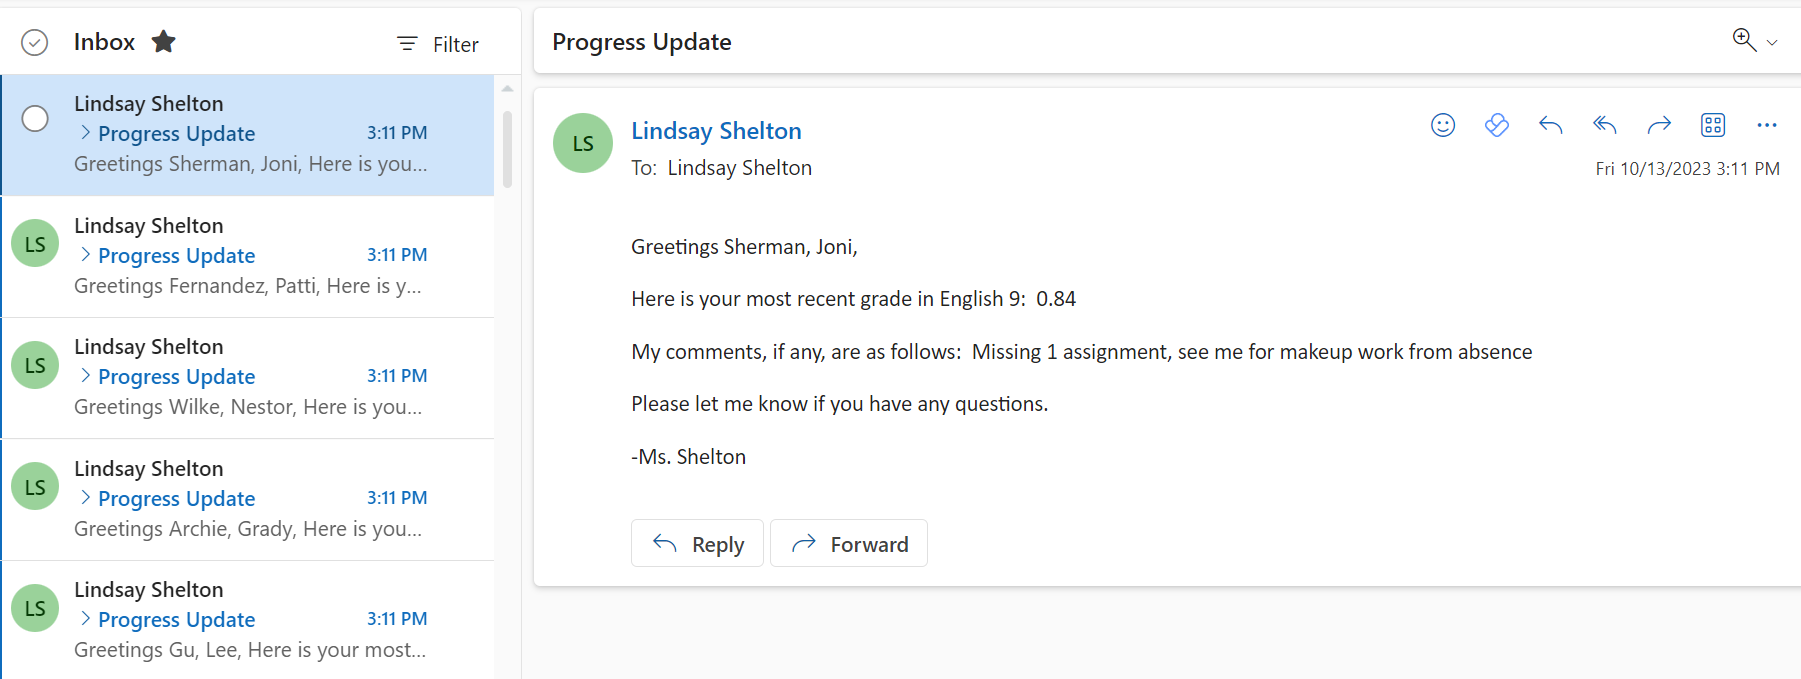
For “Subject”, you can put in whatever you want - I’m going to put in “Progress Update”.
In the “Body”, this is where you will get your variables working. When you want to refer to something from Excel, you will click the {x} button (or just type out the variable name, surrounded in % %). For example, if I want to say, “Greetings Archie, Grady,”, I’d put in “Greetings %StudentName%,”. You can customize your email body as much as you want. Here’s mine:
Greetings %StudentName%,
Here is your most recent grade in English 9: %Grade%
My comments, if any, are as follows: %Comments%
Please let me know if you have any questions.
-Ms. Shelton
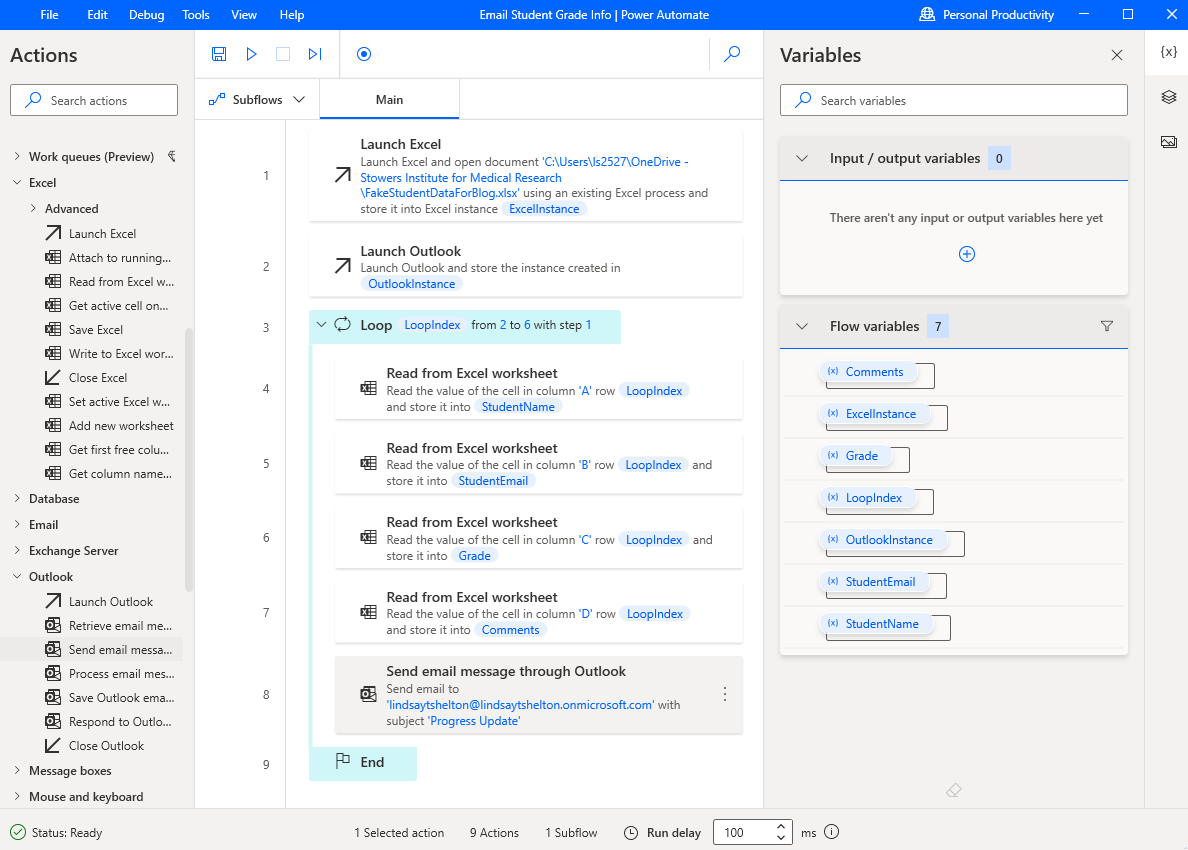
Here’s the finished flow, ready for testing:
Testing Your Flow
So I want to make sure that my emails are coming across like I want. If you have an Excel sheet with a lot of rows, I’d recommend before testing to go to your Loop. Double-click it to edit it, and change your “End to” value to something small, like 3. This will make it so that it only loops through the first 3 rows of your data, so you can make sure it’s working before you send out a bunch of emails.
This step is important - save your work! Click the file icon in the top area to save it. Then it is time to run your flow! Click the play icon right next to the save icon and watch it go.
Voila! I have 5 new emails, all personalized to my students and ready to be sent to their real email addresses!
If I’m happy with how this looks, all I have to do is edit my loop (if you shortened it for testing) and update my email action to go to the actual student email. You can insert a variable in this field just like you did in the body of the email.
Conclusion
I’ll happily update this with how it works out for Emily once I find time to sit down with her and show her the magic of Power Automate Desktop that I’ve just shared with you - she has an 11 month old, so don’t count on a firm date on that.
I hope that this intro into Power Automate Desktop was relatively painless for you. Maybe it will open the door to a lot more desktop automations, or maybe this is all you do with it - either way, if it saves you time (I’m especially looking at you, teachers!), then it’s worth it.