Using Row-Level Security in Power BI and Power Automate - Part Two
Posted on January 8, 2024 • 9 minutes • 1783 words
Table of contents
Make sure to check out Part One before reading this!
The Use Case
A brief recap - I had 19 separate Power BI reports that, for various reasons, we decided to condense into one mega report using row-level security, or RLS. This gives each lab information about their storage - how much data are they storing, what does it cost, and a list of files that haven’t been updated in 3 years that might be prime targets for archiving. This information is meant to be private to each lab - they should only see their own data.
In the first part, I set up each RLS role with its own filters in Power BI Desktop. Then I went to Power BI on the web (or Power BI Service, as it’s apparently called) and assigned Azure AD security groups to each role, along with a few individuals. One of the roles has no filters - it’s designed to see everything.
Using Row-Level Security in Power Automate
Now, this report does no one any good if I don’t share it out to people. Previously, I had set up a flow that looped through a SharePoint list of receipients and sent them each both a PDF of the report and a link to their individual report. That had to be re-thought with RLS in place, as the PDF generated would both not be filtered with RLS, and even if it was, it’s not an ideal experience to get 19 pages of PDF where your data is only located on page 14.
I sat down with a friend (thanks Cat!) and after I talked out the use case, I realized I already had a flow that looped through everything I needed.
The important part of this flow is the set-up of your source data. I used a SharePoint list where I had a column for all of the information that this flow would need:
- The name of the lab
- The user principal names (UPNs) of the people who should get each report
- The report GUID from Power BI
- The page name GUID for that individual tab
- The dataset GUID from the semantic model
The report GUID and the dataset GUID were the same for each report, but I went ahead and used the SharePoint list because that’s what I had already set up. You can save a little effort by just making an environment variable for the report GUID and the dataset GUID.
Gathering the Relevant Information
The pieces of information that I needed before I built this flow were the report GUID, the page name GUID, and the dataset GUID.
To find the report GUID, I opened the report in Power BI on the web. Look at the URL and grab the GUID that comes after the “reports” part. It will be a long string of letters and numbers, and it will be the same for each report in my case.
To find the page name GUID, you need to be in the same space, just looking elsewhere in the URL. This time, you want what comes after that report GUID and the backslash, but before the “?experience=power-bi” at the end. This will say “ReportSection_____” with a shorter GUID after it. This will be different for each tab in your report. Note that you can only put one page in - putting two of these with a semi-colon in between didn’t work for me.
To find the dataset GUID, go back to the workspace you published your report to and now look for the semantic model. Click the three ellipses next to it and click “Settings”. You will see the GUID in the URL that comes after “datasets” and before the “?experience=power-bi”.
Storing the Information
Again, I used a SharePoint list (complete with fake columns for testing purposes) to store all of this information.

(Art is my passion, clearly). Some of these columns I’ll clean up later after I’m sure I’m not going to use them, like the people picker columns and the report name column.
An alternative is to build the flow inside of a solution and to use an environment variable for the two values that will stay the same if you are using one big report- the report GUID and the dataset GUID.
To do this, go into the solution you are using, and add a new environment variable. Give it a descriptive name, select “text” as the data type, and then simply put the relevant GUIDs into the “default value” field. You can then use this environment variable where I use a SharePoint dynamic content value in the flow we are about to build.
Building the Flow
Now that we have all of the information we need, we can build the flow. I’m going to start with a recurrence trigger, set to run once a month. I’m going to use the first day of the month at 8 AM, but you can set it to whatever you want.
Next, because I’m going to add my Frankenstein’s Monster Error Handling method, I’ll add a Scope block. I won’t add the error handling for now - you can see how to do that in the linked blog post, but I will nest all of my flow actions in the Scope - Try block (just a Scope block I’ve renamed).
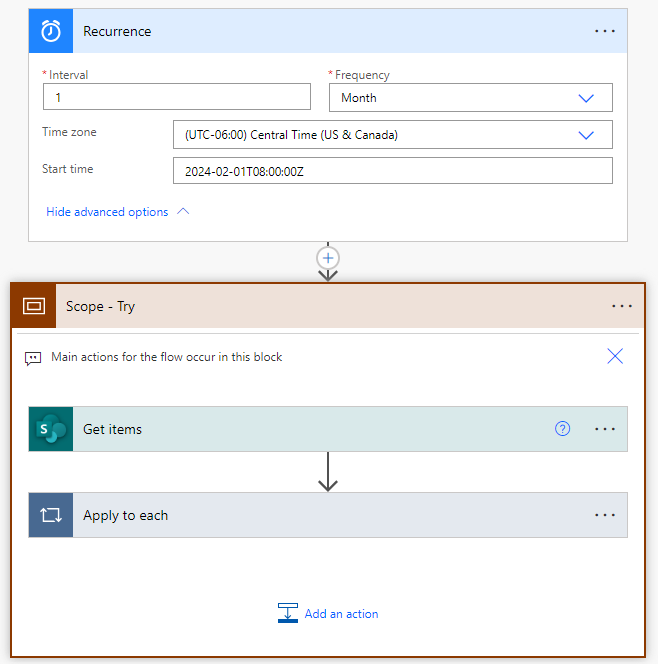
This is the entire flow, but I’ll break it down, especially what’s in that “Apply to each”.
I am doing this in the classic designer and I’ll tell you why. When I was first playing around with “can I even do this?” in a test flow, I used the new designer. I then spent two hours trying to figure out this other “required” field.
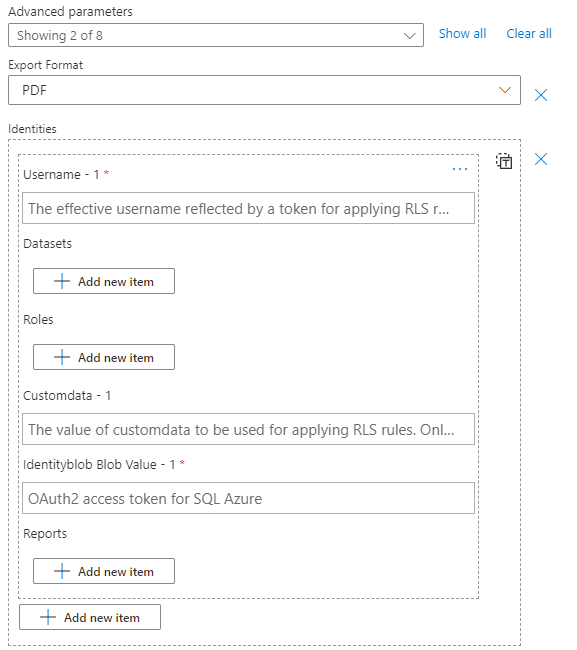
Spoiler alert - that “identity blob” stuff isn’t required for RLS at all - it’s a red herring. I’ve raised the issue with the product team, but at the time this is being written, the bug is still there. It will run in the new designer; you just have to ignore the red asterisk.
The first block in my Scope is “Get items”. This one is simple - I’m getting the items from the SharePoint list I’ve set up as my data source. Make adjustments to this method based on your data source. Note that you don’t need an action to fetch the environment variables - if you built this flow in the same solution, they will already be showing as an option for dynamic content.
The “Apply to each” is where the magic happens.
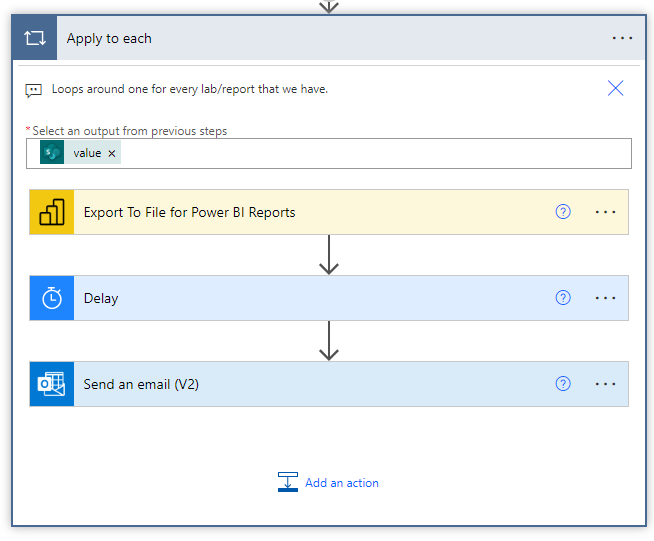
It’s still jsut three blocks inside of it, but that “value” is what makes it work. It is going to loop once for every row in my list - all 19 of them.
For the all-important “Export To File for Power BI Reports” action, this is where we are going to put in a lot of our SharePoint values to security-trim the PDF report that is generated. Note that I don’t need to do these steps if I’m allowed to just send a sharing link, but our use case calls for PDFs to be sent along with that sharing link, so onwards I go.
Leave most of the fields blank - you will want to make it a PDF, or whatever file format you prefer. For “Pages pageName”, this is where the page name GUID comes in. So if we were to look at that dynamic content value as an expression, it would read:
“items(‘Apply_to_each’)?[‘PageNameGuid’]” (with PageNameGuid being the internal name of the column I made).
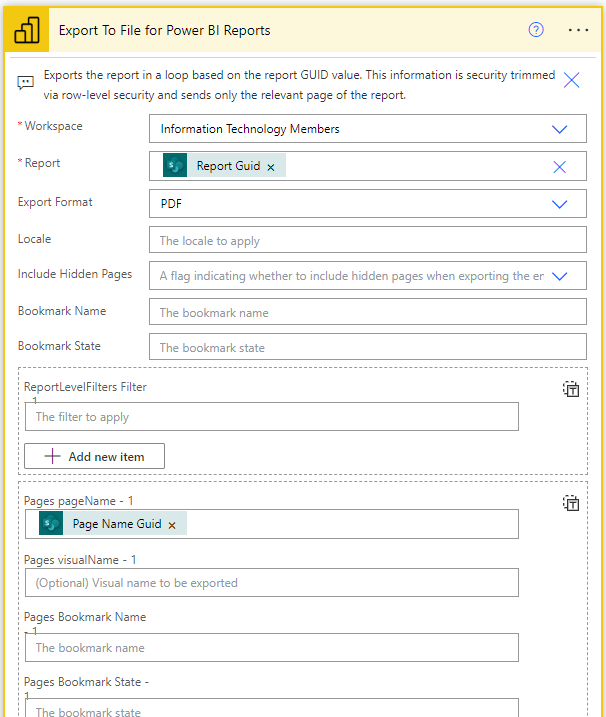
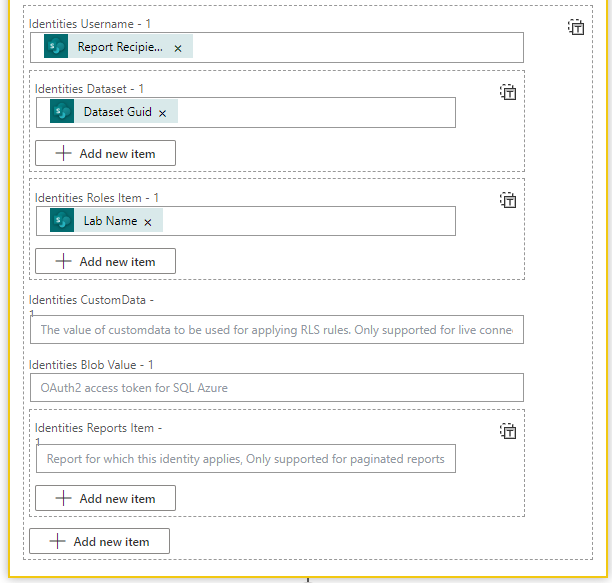
The other values you need to fill in are:
- “Identities Username” - this is the UPN of the person you are sending the report to. I went ahead and just put my UPNs in a single line of text column in SharePoint with a semicolon separating the UPNs.
- “Identities Dataset” - this is the dataset GUID from the semantic model. Either use the SharePoint dynamic content or your environment variable here.
- “Identities Roles Item” - I have “Lab Name” in here. This is just the name of the role, which I matched to the Lab Name when I built them. You may need an additional column in your list to capture these if that’s not how you did it.
The rest of the values can be left blank. What this produces is single page PDFs, one for each lab, that only show the data that the lab should see. Now, you may be reading this and thing, “If you are just printing the single page, why do you need the RLS at all?” Well, I’m glad you asked. I don’t really need it for this part, but I kept on doing it for the purposes of this blog. You’re welcome. 😂
I then added a 10 second “Delay” action just to give the flow a chance to catch up. I’m not sure if this is necessary, but I’m not taking any chances.
Then I put in a “Send an email (V2)” action to wrap up the flow. Here’s what mine looks like:
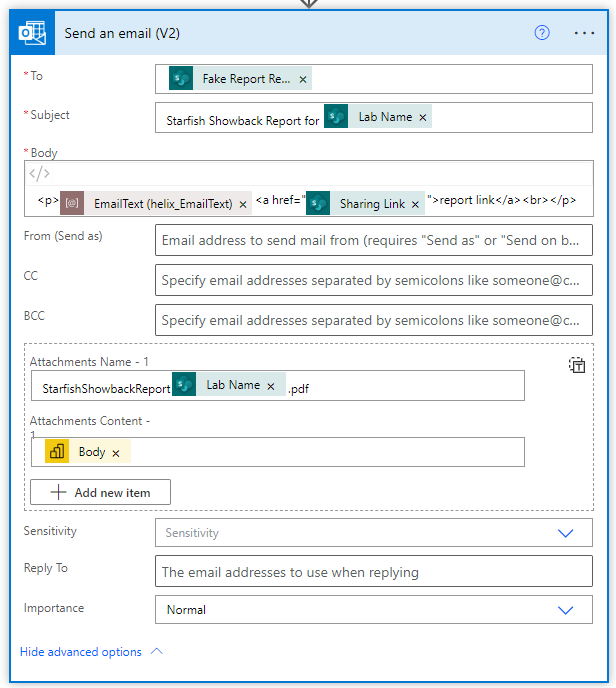
Right now, this is just going to my fake report recipients email list - I’m not trying to spam 19 PIs on a Friday afternoon. I’ve put in my various SharePoint values to make my email personalized a bit. You can see I’ve got an environment variable in use on mine - that holds the email text so that we can change that when this flow is moved to Production without altering the flow itself (which is part of why I used the SharePoint list as a data source - changes on the fly are much easier).
Make sure you “Show advanced options” so that you can get your PDF attachment in there. For the attachment name, call it whatever you like, but make sure to put “.pdf” at the end. For the attachment content, use the “Export To File for Power BI Reports” dynamic content value - it’s the file content of the PDF that was generated.
When this flow was run, I got 19 separate emails with lovely security-trimmed PDFs waiting for me!
In Conclusion
That’s the end of this tale! You now should have a working Power Automate flow that will send out personalized PDFs of your Power BI report to your recipients, with the data filtered based on the RLS you’ve set up. I had several, “Geez, I wish someone had documented this” moments along the way this week, so I hope that this helps Future You even if it doesn’t help Present Day You.
For me, now it’s off to productionalizing this flow and moving it into Production (and praying that it runs as smoothly as it did in testing on February 1st!).
